Configuration Publisher Dialog Box
In the Configuration Publisher
dialog box, you create an interface for specifying configurations of parts
and assemblies. You can use the interface in SolidWorks and in 3DContentCentral.
You can start with a model with one or more configurations. The model
must contain a design table (single or multiple rows). For more information
about model requirements, see Configuration
Publisher Overview. For more information about design tables,
see Creating
Configurations with a Design Table.
To access the Configuration Publisher dialog box:
In the Configuration Publisher
dialog box, you drag controls from the palette on the left onto the Edit tab in pane in the center. You
set attributes and visibility for each control in the pane on the right.
Available options vary depending on the control type and whether the model
has a single configuration or multiple configurations.
|
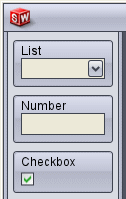
For models with a single configuration, the palette contains generic
controls (list boxes, number boxes, and check boxes). You set Control
Attributes and Control Visibility
as described below. |
|
|
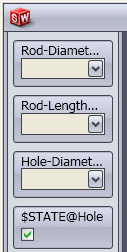
For models with multiple configurations, the palette contains a control
for each variable in the design table. Values from the design table are
automatically assigned to the controls. The only attribute you set is
Name. You can also set Control
Visibility. |
|
Control Attributes
List
Presents a list of predefined text values
in the interface you create. The following Control
Attributes are available:
Name. Labels the control with
the text you type.
Design Table Variable. Lists
available variables from the design table. Select one to assign to the
control.
Type. Sets a method for populating
the list:
List.
Populates the list with values you type in List
Values. Type one value per row and press Enter
to move to the next row.
Range
from Design Table. Populates the list with values from the design
table spreadsheet. In Range, specify
the range of cells that contain the values, in the format X1:X10.
For example, if the design table spreadsheet has values in cells H8, H9,
H10, H11, and H12, type H8:H12
to list the five values in the list box control.
Data Parent. (Not available
for the first control.) Creates a context-sensitive control by setting
different values for this control depending on the value selected for
the parent control. If you specify a data parent, the List
Values or Range table expands
to include a column for each value of the data parent, so you can assign
a different list for each.
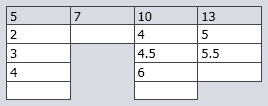
Example:
For a hollow shaft, you are creating a control for the inside diameter.
Different diameters are available depending on which length is chosen.
You specify the length variable as the data parent. Four columns appear
in List Values, one for each length
value (5, 7, 10, and 13). In each column, you type the inside diameters
available for that length. The shaft with length 7 is only available as
a solid shaft (no inside diameter).
|
|
 Data Parent values Data Parent values
|
Number
Accepts numerical values that meet the
range and the increment that you specify. The following Control
Attributes are available:
Name. Labels the control with
the text you type.
Design Table Variable. Lists
available variables from the design table. Select one to assign to the
control.
Data Parent. (Not available
for the first control.) Creates a context-sensitive control by setting
different values for this control depending on the value selected for
the parent control. If you specify a data parent, the Range
Requirements table expands to include a row for each value of the
data parent, so you can assign a different list for each.
Example:
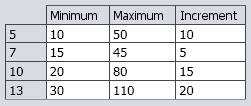
For a hollow shaft, you are creating a control for the inside diameter.
Different diameters are available depending on which length is chosen.
You specify the length variable as the data parent. Four rows appear in
Range Requirements, one for each
length value (5, 7, 10, and 13). In each row, you type the minimum, maximum,
and increment values to define the range of inside diameters available
for that length.
|
Data Parent values |
|

|
|
|
Range Requirements. Sets the
range of acceptable values for the control. Type the minimum and maximum
values of the range and the increment between values.
Checkbox
(Available only for $State
variables.) Switches between suppression states.
 = Unsuppressed
 = Suppressed
Name. Labels the control with
the text you type.
Design Table Variable. Lists
available $State variables from
the design table. Select one to assign to the control.
Data Parent. Defines the state
of this control (checked or unchecked) for each value of the parent control.
If you specify a data parent, then the state of this control is read-only
in the interface you create.
Control Visibility
Visibility Parent. Defines whether
the control is shown or hidden, depending on the value selected for the
parent control. If you select a Visibility
Parent, a table appears. In the table, specify if the current control
is shown or hidden for each value of the parent control.
= Shown
= Hidden
 Click Hide
All or Show All to uncheck
or check all boxes at once.
Click Hide
All or Show All to uncheck
or check all boxes at once.
Select None in Visibility
Parent to make the current control always visible in the interface.
Click the SW
Preview tab or the 3DCC Preview
tab to see how the interface will appear in SolidWorks and in 3D ContentCentral.
In the preview, you can make selections and update the model to verify
that the interface works as you intend.
Related Topics
Configuration
Publisher Overview
Creating
an Interface - Single-Row Design Table
Creating
an Interface - Multiple-Row Design Table
Previewing
the Interface
Editing
a Configuration Publisher Interface
Uploading
Models to 3D ContentCentral