Curve Driven Pattern PropertyManager
The Curve
Drive Pattern PropertyManager appears when you create a new curve driven pattern
feature, or when you edit an existing curve driven pattern feature.
The PropertyManager controls
the following properties:
Direction 1
Pattern
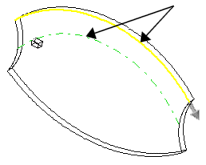
Direction. Select a curve, edge, sketch entity, or select a sketch
from the FeatureManager to use as the path for the pattern. If necessary,
click Reverse Direction  to change the direction of the pattern. The example below
uses the upper edge of the model as the Pattern
Direction for Direction 1.
to change the direction of the pattern. The example below
uses the upper edge of the model as the Pattern
Direction for Direction 1.
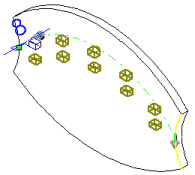
Number
of Instances  . Set a value for the number of instances
of the seed feature in the pattern.
. Set a value for the number of instances
of the seed feature in the pattern.
Equal
spacing. Sets equal spacing between each pattern instance. The
separation between instances depends on the curve selected for Pattern
Direction and on the Curve method.
|

|

|
|
Equal spacing check box cleared |
Equal spacing check box selected |
Spacing
 (Available if you do not select Equal
spacing). Set a value for the distance between pattern instances
along the curve. The distance between the curve and the Features
to Pattern is measured normal to the curve.
(Available if you do not select Equal
spacing). Set a value for the distance between pattern instances
along the curve. The distance between the curve and the Features
to Pattern is measured normal to the curve.
Curve
method. Defines the direction of the
pattern by transforming how you use the curve selected for Pattern
Direction. Select one of the following:
Transform
curve. The delta X and delta Y
distances from the origin of the selected curve to the seed feature are
maintained for each instance.
Offset curve. The normal distance from
the origin of the selected curve to the seed feature is maintained for
each instance.
Alignment
method. Select one of the following:
 of Curve method and Alignment
method selections.
of Curve method and Alignment
method selections.
Direction 2
Select to create the pattern
in a second direction.
 If you select the Direction
2 check box without selecting a sketch element or edge for Pattern Direction in Direction
2, an implicit pattern is created, based on what you selected for
Pattern Direction for Direction
1.
If you select the Direction
2 check box without selecting a sketch element or edge for Pattern Direction in Direction
2, an implicit pattern is created, based on what you selected for
Pattern Direction for Direction
1.
Pattern
Direction. Select a curve, edge, sketch entity, or select a sketch
from the FeatureManager to use as the path for the second direction of
the pattern. If necessary, click Reverse
Direction to change the direction of the pattern.
The example below uses the side edge of the model as the Pattern
Direction for Direction 2.
Number
of Instances . Set a value for the number of instances
of the seed feature in the pattern.
Equal
spacing. Sets equal spacing between each pattern instance. The
separation between instances depends on the curve selected for Pattern
Direction and on the Curve method
in Direction 1.
Spacing
(Available if you do not select Equal
spacing). Set a value for the distance between pattern instances.
Pattern
seed only. Replicates only the seed pattern, which creates a curve
pattern under Direction 2, without
replicating the curve pattern created under Direction
1.
Features to Pattern
If the feature to pattern includes fillets or other additions,
use the flyout FeatureManager design tree to select these features.
Faces to Pattern
When using Faces
to Pattern, the pattern must remain within the same face or boundary.
It cannot .
For example, a cut across the entire face or different levels (such as
a raised edge) would create a boundary and separate faces, and prevent
the pattern from propagating.
Bodies to Pattern
Instances to Skip

The pointer
changes to  when you hover over each pattern instance. Click
to select a pattern instance. The coordinates of the pattern instance
appear. To restore a pattern instance, click the instance again, or delete
the pattern instance from the Instances
to Skip box.
when you hover over each pattern instance. Click
to select a pattern instance. The coordinates of the pattern instance
appear. To restore a pattern instance, click the instance again, or delete
the pattern instance from the Instances
to Skip box.
You cannot skip instances
when you pattern bodies.
Feature
Scope
Apply features to one or more
multibody
parts
by selecting Geometry pattern
under Options, and using Feature Scope to choose which bodies
should include the features.
You must create the model to which you want to add the features
for multibody parts prior to adding those features.
All
bodies. Applies the features to all bodies every time the features
regenerate. If you add new bodies to the model that are intersected by
the features, these new bodies are also regenerated to include the features.
Selected
bodies. Applies the features to the bodies you select. If you add
new bodies to the model that are intersected by the features, you need
to use Edit Feature to edit the
pattern features, select those bodies, and add them to the list of selected
bodies. If you do not add the new bodies to the list of selected bodies,
they remain intact.
Auto-select.
(Available if you click Selected bodies).
When you first create a model with multibody parts, the features automatically
process all the relevant intersecting parts. Auto-select
is faster than All bodies because
it processes only the bodies on the initial list and does not regenerate
the entire model. If you click Selected
bodies and clear Auto-select,
you must select the bodies in the graphics area you want to include.
Bodies
to Affect  (Available if you clear Auto-select).
Select the bodies to affect in the graphics area.
(Available if you clear Auto-select).
Select the bodies to affect in the graphics area.
Options
Vary
sketch. Allows the pattern to change its dimensions as it is
repeated.
Geometry pattern.
Creates the pattern using an exact copy of the seed feature. Individual
instances of the seed feature are not solved; end conditions and calculations
are ignored. The Geometry
Pattern option speeds up the creation and rebuilding of a pattern.
You cannot create geometry patterns of features that
have faces merged with the rest of the part.