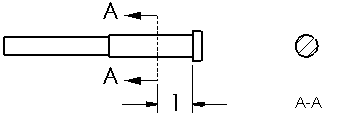
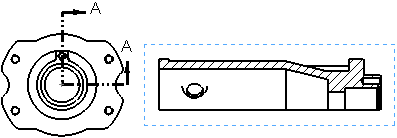
Section Views in Drawings
You create a Section View in
a drawing by cutting the parent view with a section line. The section
view can be a straight cut section or an offset section defined by a stepped
section line.

 You can also create section
views in models to populate the View
Palette.
You can also create section
views in models to populate the View
Palette.
You can
create:
Section views of section views. A new section
is calculated from the original solid model, and the view updates if the
model changes.
Section
views from orthographic (front, right, left, top, bottom, and back) exploded
views.
Part cutaway
views that create a section in a pictorial (isometric, trimetric,
or dimetric) view.
You can show
hidden edges in section
views.
Section views expand in the FeatureManager design
tree so that all components and features are available.
You can add dimensions to section lines without
editing the section line sketch. You can dimension between a section line
and another line or edge. You can also add dimensions to the parent view
to anchor the section line. You can then hide the dimension using Hide/Show
Annotations.
You can pre-select sketch entities that belong
to the drawing sheet to create section views. The sketch entities do not
have to belong to an existing drawing view.
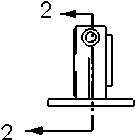
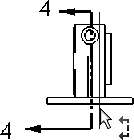
When you
create a Section (or Aligned
Section) View of an assembly drawing, you can:
Specify
the distance of the section view cut so the entire drawing view is not
cut (not available in aligned section views).
Exclude
selected components.
Exclude
fasteners (leaves most items inserted from SolidWorks Toolbox or designated
as a fastener uncut).
Control
auto hatching so that adjacent components have alternating hatch patterns.
Change
the view orientation to isometric.
You can
move the section arrow by dragging it. You can move each arrow independently.
You can
resize and reposition the section line by dragging it. If you used geometric
relations when sketching the section line, the relations might prevent
you from repositioning the section line. For example, if the section line
is coincident with the center of a hole, you cannot reposition the section
line. However, the section line will move if the hole moves.
You can
create rotated
section views if the Section View
tool is not appropriate. You can also combine a broken view with one or
more section views to create a rotated (revolved) section view.
You can cut and paste a section view to a different
sheet than the parent view.
Use these tips to troubleshoot
section views.
To create a section view:
Click Section
View  on the Drawing toolbar, or click Insert,
Drawing View, Section.
on the Drawing toolbar, or click Insert,
Drawing View, Section.
(You can also select a sketched line and then click the Section
View tool.)
The Section View
PropertyManager appears, and the Line
 tool is active.
-
Sketch a section line.
Use inferencing or add relations while sketching to relate the section
line to features in the model.
To create a multi-line section view,
or to use a centerline as the section line, sketch the section line before
clicking the Section View tool.
Multiple section lines can have the same label. A warning message appears
if the drawing standard you are using does not allow it.
If the section line does not completely cut through the bounding
box of the model in the view, you are asked if you want this to be a partial
section cut. If you click Yes,
the Section View is created as a partial section view.
If you are creating a section view of an
assembly, or if the model contains a rib feature, set options in the Section View
dialog box.
As you move the pointer, a preview of the
view is displayed if you selected Show contents while dragging
drawing view. You can also control the alignment
and orientation
of the view.
If the section line has multiple segments,
the view is aligned to the sketch segment that was last selected when
you clicked the Section View tool:
|
|

|
|
Vertical line establishes the section alignment |
Horizontal line establishes the section alignment |
Click to place the view. You can edit
the view labels, change
the alignment, or modify
the section view if necessary.
To change the orientation of a section or aligned section
view to isometric:
Right-click a section or aligned section
view and select Isometric Section View.
To remove the isometric orientation,
right-click the view and select Remove
Isometric View.