Hole Table PropertyManager
Specify properties for existing hole tables.
To specify properties for hole tables:
Access the PropertyManager by one of the following
methods:
Click
the move table icon  in the upper left corner of the table.
Right-click anywhere in the table and select
Properties.
Right-click the table in the FeatureManager
design tree and select Properties.
Specify the properties described below, then click
OK  .
.
Table Position
The stationary corner controls
the direction in which the table expands when adding new columns or rows.
Set the Stationary
corner to:
 Top Left. New columns extend to the right and new
rows extend below the anchor point.
Top Left. New columns extend to the right and new
rows extend below the anchor point.
 Top Right. New columns extend to the left and new
rows extend below the anchor point.
Top Right. New columns extend to the left and new
rows extend below the anchor point.
 Bottom Left. New columns extend to the right and new
rows extend above the anchor point.
Bottom Left. New columns extend to the right and new
rows extend above the anchor point.
 Bottom Right. New columns extend to the left and new
rows extend above the anchor point.
Bottom Right. New columns extend to the left and new
rows extend above the anchor point.
Attach to anchor point. Attaches
the specified corner to the table
anchor.
 The Stationary
corner option is not available when you first create the table.
If the table is anchored on creation, the stationary corner is automatically
selected on the drawing sheet in the quadrant nearest the table anchor.
The Stationary
corner option is not available when you first create the table.
If the table is anchored on creation, the stationary corner is automatically
selected on the drawing sheet in the quadrant nearest the table anchor.
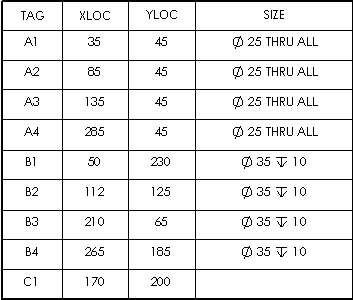
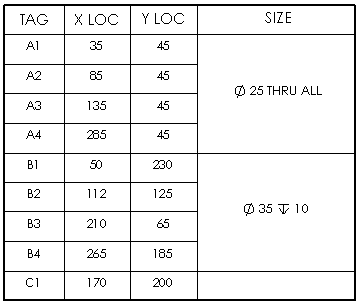
Alpha/Numerical Control
Specify the tags identifying the holes to be alphanumeric (A,
B, C...) or numeric (1, 2, 3...).
With alphanumeric tags, the letter prefix designates a specific hole size
and the number designates an instance. Use Start
at to specify a beginning letter or number.
The corresponding notes in the
view change with the table.
|
|

|
|
A, B, C... |
1, 2, 3... |
Scheme
Combine same tags. Combines
rows with holes in the same pattern, which also combines holes with the
same sizes. The columns of location values are removed. This option removes
the location columns X LOC and
Y LOC.
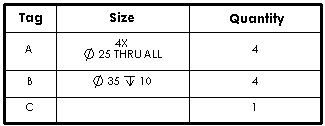
Combine same sizes. Available
only if Combine same tags is cleared.
Merges cells for holes of the same size. The columns of location values
remain.
Hole Location Precision
Specify the number of significant digits for the hole location values.
Visibility
Select to hide any or all of the following:
Hide origin indicator
Hide hole centers
Hide hole tags
Border
Click Box Border  or Grid Border
  and select a corresponding border thickness from the list.
Table with thicker box and grid borders:

Dual Dimensions
Select Dual Dimensions to display
dimensions in dual units.
Show units. Select to display
units.
Layer 
In drawings with named layers, select a layer. The table assumes the
layer color.