Triad
The triad facilitates manipulating various objects such as 3D sketch
entities, parts, certain features, and components in assemblies. See also
Reference Triad.
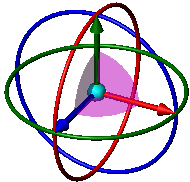
The rings and wings are displayed when rotation and dragging along the
wings' planes are possible.
To use the triad:
In assemblies, right-click a moveable component
and select Move
with Triad  .
.
In assembly exploded
views, select a component.
In parts, click Move/Copy Bodies
 (Features toolbar) or Insert,
Features, Move/Copy,
and click Translate/Rotate.
(Features toolbar) or Insert,
Features, Move/Copy,
and click Translate/Rotate.
In parts, click Flex
or Deform to use the triad to shape
features.
In 3D sketches, right-click an entity and select
Show Sketcher Triad.
Triad actions:
Dragging the center ball drags the object
freely.
Alt +
dragging the center ball drags the triad
freely and aligns it with the model geometry.
Dragging an arm drags the object in the X, Y,
or Z direction.
Dragging a wing drags the object along the wing's
plane.
Dragging a ring rotates the object about the ring's
axis.
Use commands to display information about the triad or to change the
position and orientation of the triad. Available commands depend on the
triad's context.
Show
To display information as the triad or one of its components moves,
right-click anywhere on the triad and select:
Selections
To move the triad to a selection:
Right-click on the triad (anywhere except on the
rotation rings) and choose Move to Selection.
Select an entity.
To align the center ball with a selection:
Right-click the center ball and select Align
to.
Select an entity.
 You can also align the center
ball with a component origin or the assembly origin.
You can also align the center
ball with a component origin or the assembly origin.
To align an arm or wing with a selection:
Right-click an arm or wing and choose Align
with Selection.
Select an entity.
Rotate
To rotate a component:
Select a ring and drag.
To snap, right-click
the selected ring and choose Snap while
Dragging. Close to the ring, the snap increment is 90°.
The increment decreases as the pointer moves further away from the ring.
To rotate in specified
increments, right-click the selected ring and choose Rotate
90°
or Rotate 180°.
See Instant3D.