Revision Tables
You can insert a revision table (block) and related revision symbols in a drawing. You can link revision tables to the SolidWorks Workgroup PDM product.
Insert a revision table into a drawing to track document revisions, including revision symbols. In addition to the functionality for all tables, you can select:
Revision symbols create notes with borders connected by properties to the revision table. The current revision number or letter is used.
The latest revision also appears under REV in the lower-right corner of a sheet format.
 In drawings with multiple sheets, you can set options to activate a revision table on the first sheet only, link the tables on all sheets, or keep the tables independent of each other.
To set options for revision tables in the active document:
-
Click Tools > Options > Document Properties > Tables > Revision.
-
Set the options and click OK.
To insert a revision table:
-
Click Revision Table  on the Table toolbar, or click Insert, Tables, Revision Table.
-
Set the properties in the Revision Table PropertyManager
, then click OK  .
.
You can insert text in empty cells by double-clicking the cells and typing text.
To add a revision to the table (add a row):
-
Right-click in the revision table and select Revisions, Add Revision.
A revision is added to the table with the current date. If there are already revisions in the table, the new revision appears below the last revision and includes the next letter in sequence.
-
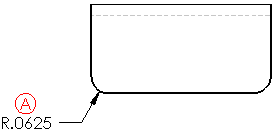
Click to place one or more revision symbols on the drawing. To add a leader, place the symbol on a vertex, edge, or face.
The symbols are Note annotations.
To add more revision symbols:
-
In a drawing with a revision already in the table, click Revision Symbol  on the Annotation toolbar, or click Insert, Annotations, Revision Symbol.
The drawing must have a revision table before you can insert a revision symbol.
- or -
Right-click in the revision table of the desired revision row and select Revisions, Add Symbol.
-
Set properties in the Revision Symbol PropertyManager. This PropertyManager uses the same conventions as the Note PropertyManager.
The revision symbol uses the revision table's settings for the shape and revision number or letter.
-
Click in the graphics area to place the symbol. You can place the symbol anywhere, and you can place multiple instances of the symbol while the Revision Symbol PropertyManager is active.

 When you insert revision symbols that use Auto Leader
  , you must hover over the entity to highlight the entity and to attach the leader. The leader does not appear until you hover over the entity. This way, the leader and highlighted entities do not hinder your view of the model or drawing view.
 an example with balloons.
-
Click OK  .
.
To edit the style, size, or text format of a revision symbol:
-
Select an existing revision symbol.
-
Edit the symbol in the Note PropertyManager.
Note Linked to Revision Level
You can link a note (generally at the lower left in the Sheet Format) to the revision letter so that it is synchronized.
To synchronize the revision in a note:
-
With no revision table in the drawing, right-click in the graphics area and select Edit Sheet Format.
-
Click Note  on the Annotation toolbar, or click Insert, Annotations, Note.
-
Click in the graphics area to place the note.
-
In the PropertyManager, under Text Format, click Link to Property  .
.
-
In the dialog box, click File Properties.
-
In the Summary Information dialog box, on the Custom tab:
-
Select Revision in Property Name.
-
Click in Value / Text Expression, and press the spacebar.
-
Click OK.
-
In the Link to Property dialog box, under Use custom properties from, select Revision from the list, then click OK.
-
Click OK  .
.
-
Right-click in the graphics area and select Edit Sheet.
-
Insert a revision table.
-
Right-click in the revision table and select Revisions, Add Revision.
The note displays the latest revision level.