When you create a study, the program automatically determines the mesh type to be solid, shell, or mixed based on the existing geometry.
Creating Shell Mesh
| Sheet Metals |
Sheet metals with uniform thicknesses (except for drop test studies) are treated as shells automatically by the program. The software extracts the mid-surfaces and generates shell mesh at the mid-surface. |
| Surface Geometries
|
Surface geometries are treated as shells automatically by the program. The shell mesh is generated on the surface (located at the mid-surface of the shell).
|
| Solid Parts |
Solid parts are not meshed with shell elements. However, you can still create a surface geometry from a solid face. Do one of these:
- Open a part document and click . You then select the solid face to offset and specify the direction and offset distance.
- Click to insert a midsurface between a pair of faces.
The program creates a mixed mesh automatically when different geometries are present in the model.
|
Assigning Thickness
| Sheet Metal |
The program automatically extracts and assigns the thickness of the sheet metal to the shell. You cannot modify the thickness. You can select between the thin shell and thick shell formulations. |
| Surface Geometry
|
The program assigns a zero thickness by default. You can modify the thickness of shell in the PropertyManager. You can also select between the thin and thick shell formulations.
|
As a general guideline, thin shells can be used when the thickness to span ratio is less than 0.05.
Applying Loads, Fixtures, and Mesh Controls
| Sheet Metal |
The loads and fixtures are automatically transferred to the mid-surface.
- To apply a fixture or a load or mesh control to a shell edge, select the associated face of the solid.
- To apply a fixture, load, or mesh control to shell vertex, select the associated edge of the solid.
|
| Surface Geometry
|
- Apply load or fixture to the edges and/or vertices of the surfaces.
- You can apply pressure to a shell edge. The pressure is specified per unit area. The program internally uses the thickness of the shell. The equivalent force applied to the edge is equal to the pressure value times the length of the edge times the thickness of the shell.
Since shell elements have rotational degrees of freedom, you must differentiate between the Immovable (no translation) and the Fixed Geometry (no translation and no rotation) options. You can also apply concentrated moments using the Force/Torque PropertyManager.
|
Meshing
Apply the desired mesh control on the appropriate faces, edges, and vertices. Before meshing, verify the active meshing options, and specify all desired mesh controls.
When editing a shell, you can select thin or thick shell formulation. Thin shells can be used when the thickness to span ratio is equal to or less than 0.05.
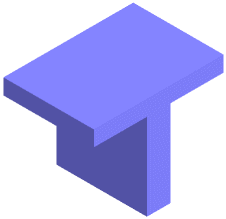
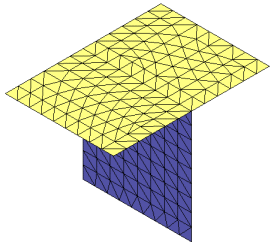
T-Shaped and Intersecting Shells
While it is possible to orient shells on sheet metals properly, it is not possible to do so for T-shaped and intersecting shells. In such cases, some edges will have mis-aligned elements. As a result, nodal stresses are not correct along these edges. We recommend to display elemental stresses for such models since no cross-element averaging is involved.
Example
 |
 |
| T-shaped model
|
Shell meshing of the model
|
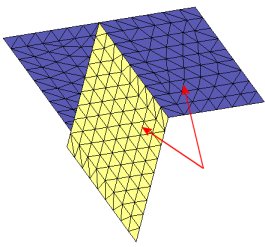 |
| Shell meshing of T-shaped models always generates shells that cannot be consistently aligned.
|
Viewing Stress Results for Shells
When listing or plotting stress results , you can select one of the following options:
| Top |
Total (membrane + bending) stresses on the top face |
| Bottom |
Total (membrane + bending) stresses on the bottom face |
| Membrane |
Membrane stress component |
| Bending |
Bending stress component |
Refer to the Viewing Results section for more details.
Although displacement results in static studies and temperature results in thermal studies do not change if the shells are not aligned, it is recommended to align the shells for all studies. Click Automatic shell surface re-alignment in Default Options > Mesh to let the software automatically realign the shell surfaces.