Expand IntroductionIntroduction
Expand AdministrationAdministration
Expand User InterfaceUser Interface
Expand SOLIDWORKS FundamentalsSOLIDWORKS Fundamentals
Expand Moving from 2D to 3DMoving from 2D to 3D
Expand AssembliesAssemblies
Expand CircuitWorksCircuitWorks
Expand ConfigurationsConfigurations
Expand SOLIDWORKS CostingSOLIDWORKS Costing
Expand Design CheckerDesign Checker
Expand Design Studies in SOLIDWORKSDesign Studies in SOLIDWORKS
Expand Detailing and DrawingsDetailing and Drawings
Expand DFMXpressDFMXpress
Expand DriveWorksXpressDriveWorksXpress
Expand FloXpressFloXpress
Expand SLDXML Data ExchangeSLDXML Data Exchange
Expand Import and ExportImport and Export
Expand Model DisplayModel Display
Expand Mold DesignMold Design
Expand Motion StudiesMotion Studies
Expand Parts and FeaturesParts and Features
Collapse RoutingRouting
Expand Sheet MetalSheet Metal
Expand SimulationSimulation
Expand SimulationXpressSimulationXpress
Expand SketchingSketching
Expand Sustainability ProductsSustainability Products
Expand SOLIDWORKS MBDSOLIDWORKS MBD
Expand SOLIDWORKS UtilitiesSOLIDWORKS Utilities
Expand TolerancingTolerancing
Expand TolAnalystTolAnalyst
Expand ToolboxToolbox
Expand WeldmentsWeldments
Expand Workgroup PDMWorkgroup PDM
Expand TroubleshootingTroubleshooting
Glossary
Hide Table of Contents

Elbows

Elbows can be created for use in a route where the line changes direction. This structured method of construction allows the elbows to be created automatically as the route is created.

Generally, elbows are created for the conditions where pipes meet at right (90 degree) and 45 degree angles. Other angles are usually covered by using custom elbows, which are automatically converted from the standard one.

elbow.gif

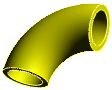
An elbow can contain configurations for many different types and sizes of elbow, including different bend angles and radii.

Some sample elbows are supplied with the software. You can create your own elbows by editing the sample file or creating your own part file. See Routing File Locations for the location of sample parts and for recommendations on where to store new components you create.

If you select Always use elbow in the Route Properties PropertyManager when you start a route, the software inserts an elbow automatically wherever there is a fillet in the 3D sketch. You can also add elbows manually.

To identify the part as an elbow, so the software recognizes it when you browse for elbows from the Route Properties PropertyManager, the component must contain two connection points, plus a sketch named ElbowArc containing dimensions named BendRadius and BendAngle.

You can also use the Routing Component Wizard in the Routing Library Manager to prepare an elbow.


Provide feedback on this topic

SOLIDWORKS welcomes your feedback concerning the presentation, accuracy, and thoroughness of the documentation. Use the form below to send your comments and suggestions about this topic directly to our documentation team. The documentation team cannot answer technical support questions. Click here for information about technical support.

* Required

 
*Email:  
Subject:   Feedback on Help Topics
Page:   Elbows
*Comment:  
*   I acknowledge I have read and I hereby accept the privacy policy under which my Personal Data will be used by Dassault Systèmes

Print Topic

Select the scope of content to print:

x

We have detected you are using a browser version older than Internet Explorer 7. For optimized display, we suggest upgrading your browser to Internet Explorer 7 or newer.

 Never show this message again
x

Web Help Content Version: SOLIDWORKS 2015 SP05

To disable Web help from within SOLIDWORKS and use local help instead, click Help > Use SOLIDWORKS Web Help.

To report problems encountered with the Web help interface and search, contact your local support representative. To provide feedback on individual help topics, use the “Feedback on this topic” link on the individual topic page.