Specify properties for punch tables in drawings.
To open this PropertyManager:
In a flat pattern drawing view, click Punch Table  (Table toolbar) or .
Table Template
Click Open table template for Punch Table  to choose a standard or custom template. This option is available only during table insertion. The punch table templates supplied with the software add columns to the default format. They are located at
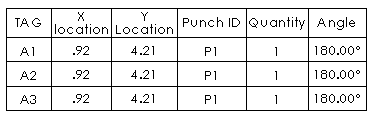
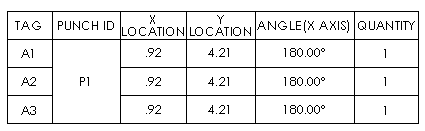
install_dir\lang\english. The standard template (punchtable-standard.sldpuntbt) creates Tag, X Location, Y-Location, Punch ID, Quantity, and Angle columns.
to choose a standard or custom template. This option is available only during table insertion. The punch table templates supplied with the software add columns to the default format. They are located at
install_dir\lang\english. The standard template (punchtable-standard.sldpuntbt) creates Tag, X Location, Y-Location, Punch ID, Quantity, and Angle columns.
Table Position
The stationary corner controls the direction in which the table expands when adding new columns or rows.
Set
Stationary corner to:
 |
Top Left |
New columns extend to the right and new rows extend below the anchor point. |
 |
Top Right |
New columns extend to the left and new rows extend below the anchor point. |
 |
Bottom Left |
New columns extend to the right and new rows extend above the anchor point. |
 |
Bottom Right |
New columns extend to the left and new rows extend above the anchor point. |
|
Attach to anchor point
|
Attaches the specified corner to the Table Anchors.
|
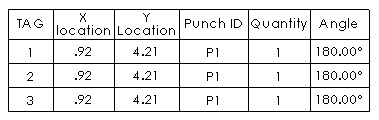
Alpha/Numerical Control
Select letters or numbers for punch table tag sequencing.
| A, B, C |
Defines the punch tag sequence as a letter. |
 |
| 1, 2, 3 |
Defines the punch tag sequence as a number. |
 |
| Start at |
Sets the first tag. |
|
Datum
During insertion, Origin is ready for you to select a vertex. To define the origin with an X axis and Y axis, click X Axis Direction Reference and select a horizontal model edge in the graphics area, then click Y Axis Direction Reference and select a vertical model edge.
After the table has been created, you can drag the datum origin to another position, or you can edit the datum definition. The location values in the table update.
Features
Select individual edges, faces, or features to include all of the punch features.
Scheme
|
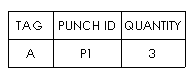
Combine same tags
|
Select to combine items with the same Punch IDs in one row.
|
|
Combine same types
|
Available only if Combine same tags is cleared. Merges cells for punch features with same Punch ID. The columns of location values remain.
|
Punch Location Precision
Specify the number of significant digits for the punch feature location values.
Border
 |
Box Border |
Sets a line thickness for the outside border of the table. |
 |
Grid Border |
Sets a line thickness for the inner grid lines of the table. |
Dual Dimensions
Select Dual Dimensions to display dimensions in dual units.
|
Show units
|
Select to display units.
|
Layer
 |
Layer |
In drawings with named layers, select a layer. |