Hide Table of Contents

Caustics

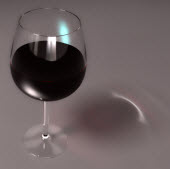
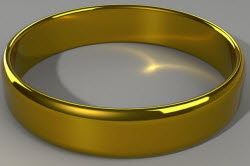
When light refracts through or reflects off of a surface, these bent rays are focused together, creating a bright pattern referred to as a caustic.

Refractive Caustic Reflective Caustic
indirect_caustics_wineglass.jpg Caustics_Direct_Reflective_HighQuality_100000.jpg
The light refracts through the wine glass. The light reflects off the gold ring.

In addition to reflective and refractive, there are two other types of caustics:

Indirect caustics

Caustics created by indirect lighting (scene illumination).

Indirect refractive caustics are always on in SOLIDWORKS.

Indirect reflective caustics are always off in SOLIDWORKS.

Direct caustics

Caustics created by direct lighting, including spot or point lights.

Directional lights do not affect direct or indirect caustics.

Direct caustics are only visible when reflected off a floor appearance or real geometry. To turn on direct caustics, click PhotoView > Options and use the PropertyManager. Direct caustics are only visible in the final render image.

Creating Direct Caustic Effects

You can create direct caustic effects for a more photorealistic rendering of your model.

To create direct caustic effects in a model:

  1. Set up a spot or point light, point it at your model, and turn it on in PhotoView.
  2. Add a floor by creating physical geometry beneath your model or adding a floor appearance to the scene.
    Direct caustics only appear when reflected off physical geometry or a floor appearance
  3. Click PhotoView 360 > Options.
  4. In the PropertyManager, select Direct Caustics and set the Caustic Amount and Caustic Quality values.
    Higher values for Caustic Amount increase the visible area and intensity of the caustics. Higher values for Caustic Quality increase the visual quality of the caustics.
    pv_caustic_amount.png
    Increased Caustic Amount, left to right
    pv_caustic_quality.png
    Increased Caustic Quality, left to right

    As you decrease the caustic amount, you may want to increase the caustic quality to avoid graininess. As you increase the caustic amount, you may want to decrease the caustic quality to create a sharper appearance. Higher values for Caustic Amount and Caustic Quality increase rendering time.

  5. Click PM_OK.gif.
  6. Click PhotoView 360 > Final Render.
    The Preview and Final Render windows open. Direct caustics are only visible in the Final Render.


Provide feedback on this topic

SOLIDWORKS welcomes your feedback concerning the presentation, accuracy, and thoroughness of the documentation. Use the form below to send your comments and suggestions about this topic directly to our documentation team. The documentation team cannot answer technical support questions. Click here for information about technical support.

* Required

 
*Email:  
Subject:   Feedback on Help Topics
Page:   Caustics
*Comment:  
*   I acknowledge I have read and I hereby accept the privacy policy under which my Personal Data will be used by Dassault Systèmes

Print Topic

Select the scope of content to print:

x

We have detected you are using a browser version older than Internet Explorer 7. For optimized display, we suggest upgrading your browser to Internet Explorer 7 or newer.

 Never show this message again
x

Web Help Content Version: SOLIDWORKS 2016 SP05

To disable Web help from within SOLIDWORKS and use local help instead, click Help > Use SOLIDWORKS Web Help.

To report problems encountered with the Web help interface and search, contact your local support representative. To provide feedback on individual help topics, use the “Feedback on this topic” link on the individual topic page.