Organizing Solid Bodies

In the FeatureManager design tree, you can organize and manage solid bodies in several ways.

  • Group bodies into folders in Solid Bodies .
  • Select commands to apply to all bodies within a folder.
  • List the features that belong to each body.

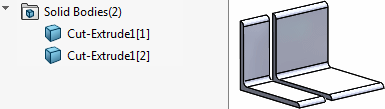
The number of solid bodies in the part document appears in parentheses next to Solid Bodies . If several bodies are created from the same feature, an instance number appears in square brackets after each instance listed in Solid Bodies . For example, the following part contains two solid bodies created by one extruded cut:

You can toggle the display of hidden and shown bodies. Then in the graphics area, you can select which hidden bodies you want to show.

Grouping Bodies into Folders

To group bodies into folders:

  1. Expand Solid Bodies in the FeatureManager design tree.
  2. Right-click a solid body name, select Add to New Folder, and name the folder.
    The selected solid body is listed in the new folder. You can drag other bodies into the same folder, and create other new folders and subfolders.

Applying Commands to All Bodies in a Folder

To apply commands to all bodies within a folder:

  1. Right-click the folder.
  2. Select a command such as Hide Solid Body, Delete Body, Appearance, and so on.
    The command is applied to all bodies in the folder.

Listing the Features that Belong to Each Solid Body

To list the features that belong to each solid body:

  1. Right-click Solid Bodies in the FeatureManager design tree.
  2. Select Show Feature History.
  3. Expand the solid body to see the features that belong to that body.
  4. To hide the feature history, right-click Solid Bodies and clear Show Feature History.