| |
Curves |
Determines the curves used to create the boundary feature in this direction. Select sketch curves, faces, or edges to connect. Boundary features are created based on the order of curve selection.
For each curve, select the point from which you want the path of the boundary feature to travel.
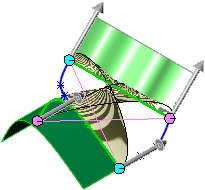
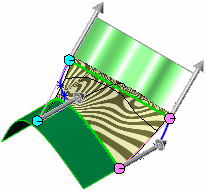
If the boundary feature connectors are incorrect, right-click in the graphics area and select Flip Connectors to try to fix them.
 |
| Incorrect connectors |
 |
| Flip Connectors applied |
|

 |
Move Up and Move Down |
Adjusts the order of the curves. Select a Curve and adjust the order. If the preview shows an undesirable
boundary feature, reselect or reorder the sketches to connect
different points on the curves.
|
| |
Dir1 curves influence |
Select one of the following:
|
Global
|
Extends the curve influence to the
entire boundary feature.
|
|
To Next Curve
|
Extends the curve influence to the next
curve only.
|
|
To Next Sharp
|
Extends the curve influence to the next
sharp only. A sharp is a hard corner of the profile. Any
two contiguous sketch entities that do not have a common
tangent or an equal curvature relation with respect to
each other define a sharp. See Guide Curves in
the Loft PropertyManager.
|
|
To Next Edge
|
Extends the curve influence to the next
edge only.
|
|
Linear
|
Extends the influence of the curve
uniformly over the entire boundary feature, similar to a
ruled surface. This option helps to avoid excessive
curvature (pocketing) effects by a highly-indented guide
curve on surfaces where curves in a single direction are
coincident to each other.
|
The curves influence option you select
for a direction is applied to all selections in the direction.
You can experiment by changing the curves influence options in
one or both directions to control your boundary feature design.
Example: Curves Influence Options The availability of curves influence options
depends on the geometry of the curves you select for a
direction.
|
| |
Tangent Type |
Select one of the following:
|
Default
|
(Available when you have a minimum of three curves in the direction.) Approximates a parabola scribed between the first and last profiles. See Start/End Constraints in the Loft PropertyManager. The tangency from this parabola drives the lofted surface, which results in a more predictable and natural lofted surface when matching conditions are not specified.
|
|
None
|
No tangency constraint (zero curvature) is applied.
|
|
Normal to Profile
|
(Available when the curves are not attaching a boundary feature to existing geometry.) Applies a tangency constraint normal to the curve. Set the Draft angle and Tangent influence (%).
|
|
Direction Vector
|
Applies a tangency constraint based on a selected entity used as a direction
vector. Select a Direction
Vector
 , then
set the Draft
angle and Tangent influence (%). , then
set the Draft
angle and Tangent influence (%).
|
|
Tangency to Face
|
(Available when attaching a boundary feature to existing geometry.) Makes the adjacent faces tangent at the selected curve. Set the Tangent influence (%).
|
|
Curvature to Face
|
(Available when attaching a boundary feature to existing geometry.) Applies a smooth, visually appealing curvature continuous surface at the selected curve. Set the Tangent influence (%).
|
|
| |
Alignment |
(Available only for single-directional cases.) Controls
alignment of the iso parameters, which control the flow of the
surface. |
| |
Direction Vector |
(Available with Direction Vector selected for Tangent Type.) Applies a tangency constraint based on a selected entity used as a direction vector. The boundary feature is tangent to the selected linear edge or axis, or to the normal of a selected face or plane. You can also select a pair of vertices to set the direction vector. |
| |
Draft Angle |
Applies a draft angle to the start or end curve. If
necessary, click Reverse
Direction
 . For
single-direction boundary features, draft angle is available for all
Tangent Types. For
bidirectional boundary features, if you connect to an existing
entity that has draft, Draft
Angle is not available because the system
automatically applies the same draft to the boundary feature at the
intersecting curve. . For
single-direction boundary features, draft angle is available for all
Tangent Types. For
bidirectional boundary features, if you connect to an existing
entity that has draft, Draft
Angle is not available because the system
automatically applies the same draft to the boundary feature at the
intersecting curve. |
| |
Tangent influence (%) |
(Only available with Global or To Next
Sharp selected for curves influence and with curves in both
directions. Not available with Tangent
Type set to None or Default.) Extends the curve influence toward the
next curve. Higher values extend the tangency's effective distance.
This is useful for very rounded shapes. Example: Tangent Influence (%) Option |
| |
Tangent Length |
(Not available with None selected for Tangent Type for any curve). Controls the amount of
influence on the boundary feature. The effect of tangent length is
limited up to the next section. If necessary, click Reverse Tangent Direction
 . . |
| |
Apply to all |
(Available only for single-directional cases.) Displays one handle that controls all the constraints for the entire profile. Clear this option to display multiple handles that permit individual segment control. Drag the handles to modify the tangent length. See Start/End Constraints in the Loft PropertyManager. |