After you add a textural appearance to the model, you use the
3D Texture tool to transform the textural
appearance into grip bumps. You can then manufacture the model and bumps with a 3D printer
or other manufacturing methods.
Make sure you applied the textural appearance to the model per the previous
topic.
To create 3D textures:
-
In the FeatureManager®
design tree, in the Solid Bodies
 folder, right-click
Imported1
folder, right-click
Imported1
 and click 3D Texture
 .
.
In the
3D Texture
PropertyManager, under
Body to
texturize,
Imported1
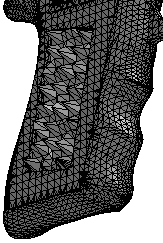
appears. You can apply
3D Texture
features to only one body at a time. The entire body displays as a mesh. The
textural appearance mesh displays its initial shape.

Under Texture
Settings, note the default values for Refinement and Distance.
-
Clear Dynamic Help,
which are expanded tooltips.
-
Under Texture
Settings, in the table, select the 2D image in the first row for
Texture.
Convert this texture to
3D and White up Black
down are selected.
-
Clear White up Black
down to use the black colors from the appearance to create the
maximum offset distance of the 3D texture feature.
The icon in the table changes to

, indicating that black is up.
Specify this option based on the grayscale heightmap you use and the displayed
results.
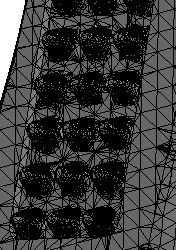
-
Move the slider for Texture Offset Distance to adjust
the Distance value in the table. This value controls the
maximum offset distance for the 3D texture from the body.
-
Move the slider for Maximum
Element Size to further define the 3D texture by controlling the
maximum element size for the entire mesh.
-
Move the slider for Texture
Refinement to control the Refinement value.
This value controls the local mesh refinement in the area
of the 3D texturized feature. Refinement adds facets to better match
contours within the grayscale image. When you increase this value, the model
display quality increases but the processing time increases too.
-
Continue to adjust the values until you achieve acceptable
results.
-
Click
 .
.
Recommendation: Because the
3D Texture feature converts the body to a graphics body, you
should add the
3D Texture feature as the
last feature in your part.
The 3D Texture
feature with a graphics
body appears in the FeatureManager design tree. In the Graphic Bodies
 folder, Graphic (Closed)
 indicates that the
generated model is watertight and that you can 3D print it.
indicates that the
generated model is watertight and that you can 3D print it.
You can then convert the graphics body into a mesh BREP body to
use for manufacturing purposes. Select the graphics body and click

.