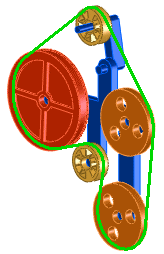
Belt/Chain Assembly Feature
|
Use the Belt/Chain assembly
feature to model systems of belts and pulleys or chains and sprockets.
This feature creates:
The software calculates the length of the belt based on the positions
of the pulleys. Optionally, specify the length of the belt and have the
pulley positions adjust (at least one pulley must have an appropriate
degree of freedom).
You can select to automatically create a new part containing the belt
sketch and add the part to the assembly. In the part file, use the sketch
as a sweep path to create a solid belt. |
|
 You can also create belts using blocks in
sketches.
You can also create belts using blocks in
sketches.
To create a belt/chain assembly feature:
Click Belt/Chain
 (Assembly toolbar) or Insert,
Assembly Feature, Belt/Chain.
(Assembly toolbar) or Insert,
Assembly Feature, Belt/Chain.
Set the PropertyManager
options.
Click  .
.
In the FeatureManager design tree, the following
appear:
A Belt
 feature. The belt length appears next to the feature.
A BeltMates
 folder (under Mates
 ), containing mates between adjacent pulleys.
To see the belt curve when
the PropertyManager is closed, select the Belt
feature in the FeatureManager design tree.
If you selected Create
belt part, a new part containing the belt sketch is created and
added to the Belt folder in the assembly. The part has:
An external reference
to the assembly.
A LockToSketchMate
 that constrains the belt part to the belt sketch.
Custom properties Belt Length and Belt
Thickness.
If you selected Engage
belt, you can drag to rotate one pulley to see all the pulleys
rotate.
If you did not
select Engage belt, you can reposition
one pulley without causing the others to rotate.