Creating and Editing
Weld Beads
To add a weld bead between components:
Insert the components in an assembly, and add
mates to position them as needed for the specific weld type you plan to
use.
Click Insert,
Assembly Feature, Weld
Bead.
In the Weld Bead
Type dialog box, select a weld Type
from the list, then click Next.
In the Weld Bead
Surface dialog box:
Select a Surface
Shape from the list (Flat,
Convex, or Concave).
Specify the Top
Surface Delta, the Bottom Surface
Delta and Radius as required
for the Type and Surface
Shape selected. See Surface Delta and Radius.
-
Click Next.
The Weld Bead Mate Surfaces
dialog box appears. Be sure to read the information in the dialog box
about selecting faces for the weld type you have chosen.
Select the necessary faces. For all welds, you
must select Contact Faces. Depending
on the type of weld you are adding, you may also need to select Stop Faces and Top
Faces. Click each box, then select the faces in the graphics area.
|
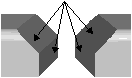
Contact
Faces are the faces that are joined by the weld bead. Select a
face (or a set of adjacent faces) on each component. |
|
|
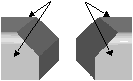
Stop Faces
are the faces that define the beginning and the end of the weld bead.
On each component, select two faces (or two sets of adjacent faces) that
share an edge with the contact faces. |
|
|
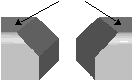
Top Faces
are the faces from which to measure the Top
Surface Delta. On each component, select one face that shares an
edge with a contact face. |
|
Click Next.
In the Weld Bead
Part dialog box, either accept the default name for the Weld
Bead Part, or enter a new part name, and click Finish.
To edit a weld:
In the FeatureManager design tree, expand the
Bead component.
Right-click the Weld
Bead feature and select Edit Feature.
In each of the dialog
boxes, change the parameters as needed. Click Next
to continue, then click Finish
when you reach the last dialog box.