Creating Camera-based Animations Using Key Points
You can create animations by defining camera properties at key points
in the key frame. You can also define lighting properties at key points.
 If you set the time 00:00:00
key frame to be through the camera, the entire animation is viewed through
the camera unless you add other key points to change the view orientation.
Camera Controls
You can control camera movement while looking through the camera:
Back and forth along the target path
Up, down, left, and right in the view plane
Using the pitch and yaw
While rolling the camera about the target line
You can use mouse and keyboard combinations to control the camera view:
|
Keyboard/Mouse Action |
Camera Action |
Pointer |
|
Middle-drag |
Rotate |

|
|
|
|
|
|
Ctrl+ Middle-drag |
Pan |

|
|
|
|
|
|
Shift+ Middle-drag |
Zoom in/out |

|
|
|
|
|
|
Alt+ Middle-drag |
Roll about the target line |

|
|
|
|
|
|
Ctrl+Alt+ Middle-drag |
Turn the camera about its position |

|
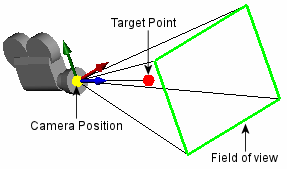
You can also drag the camera controls in the graphics area, or specify
properties in the Camera
PropertyManager:
Camera Position. Attach to a sketch entity to the camera
sled. You
can change the camera position along the X, Y, and Z axes. Target Point.
Attach the target point to another sketch entity on the camera sled, or
to a sketch entity on the target objects that the camera sees. Field of view.
Manipulate the area that the camera sees. Control the perspective from
a wide view, to a narrow view. |

|

 When you add a camera, the screen
splits into two viewports. You can attach
and manipulate a camera on the left viewport, and preview the results
on the right viewport.
To create camera-based animations by defining key points:
Open the model and click a motion study tab.
By default, the name of this tab is
Motion Study 1.
In the DisplayManager, under Scene,
Lights, and Cameras, right-click the Camera
folder and select Add Camera.
The graphics area splits into two viewports
with the camera view on the right.

The timeline is set at 00:00:00.
Select
Lock camera position except when editing in the camera PropertyManager
to prevent capture of unwanted model movements.
 Select Show
numeric controls to give you precise control of the target point
and camera position.
Click  to accept the camera position
and settings.
Enable
view key creation.
Drag the timeline
to the first intermediate time in the animation sequence.
Expand Lights, Cameras.
and Scene  (MotionManager
design tree) and double-click the camera whose position you are editing.
Click in Position
by selection under Camera Position
in the PropertyManager.
Drag camera in the left viewport of the graphics
area to select an intermediate position.
For example, move the camera a little closer,
more centered on the hole, and down toward the left.
Click  .
.
The changebar in the Camera1
key frame turns beige, indicating the animation is viewed through Camera1 from time 00:00:00
to 00:00:05.

Repeat steps 6 through 10 for each time in the
animation sequence.
Example
