Connector - Bolt
A Bolt  can connect two components, multiple components, or a component and the ground. You can define bolts through a mixed stack of solids, shells and sheet metal bodies. You can also define a bolt by selecting entities of the same component.

Type
|
Bolt Type
|
Options
|
|

Standard or Counterbore with Nut
|
-
Circular Edge of the Bolt Head Hole  and Circular Edge of the Bolt Nut Hole . Select an edge to define the bolt head and bolt nut location, respectively. and Circular Edge of the Bolt Nut Hole . Select an edge to define the bolt head and bolt nut location, respectively.
-
Same head and nut diameter. Select if the bolt head is the same diameter as the nut.
-
Head Diameter  and Nut Diameter and Nut Diameter  . Set the units and value of the diameter of the bolt head and bolt nut, respectively. By default, the program multiplies the shank diameter by a factor of 1.5 to obtain the head diameter. . Set the units and value of the diameter of the bolt head and bolt nut, respectively. By default, the program multiplies the shank diameter by a factor of 1.5 to obtain the head diameter.
-
Bolt Shank Diameter  . Set the units and value of the diameter of the shank. . Set the units and value of the diameter of the shank.
|
|

Countersink with Nut
|
-
Conical Face  . Select a conical face to define the bolt head. . Select a conical face to define the bolt head.
-
Circular Edge of the Bolt Nut Hole . See earlier description.
-
Nut Diameter and Bolt Shank Diameter . See earlier description. By default, the program multiplies the shank diameter by a factor of 1.5 to obtain the nut diameter.
|
|

Standard or Counterbore Screw
|
-
Circular Edge of the Bolt Head Hole . See earlier description.
-
Thread Face(s)  . Select the hole faces from a component in contact with the threads. . Select the hole faces from a component in contact with the threads.
-
Head Diameter and Bolt Shank Diameter . See earlier description. By default, the program multiplies the shank diameter by a factor of 1.5 to obtain the head diameter.
|
|

Countersink Screw
|
-
Conical Face . See earlier description.
-
Thread Face(s) . See earlier description.
-
Bolt Shank Diameter . See earlier description.
|
|

Foundation Bolt
|
-
Circular Edge of the Bolt Head Hole . See earlier description.
-
Target plane  . Select a plane to model a virtual wall. You must define a Virtual Wall contact condition to prevent penetration into the foundation. . Select a plane to model a virtual wall. You must define a Virtual Wall contact condition to prevent penetration into the foundation.
-
Nut Diameter and Bolt Shank Diameter . See earlier description. By default, the program multiplies the shank diameter by a factor of 1.5 to obtain the nut diameter.
|
 The value for Bolt Shank Diameter
should be equal to or less than the diameters of the Thread face(s).
The value for Bolt Shank Diameter
should be equal to or less than the diameters of the Thread face(s).
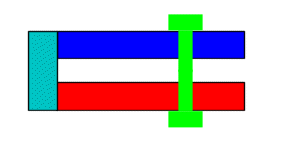
Tight Fit
Select if the radius of the shank is equal to the radius of the cylindrical faces associated with at least one of the components. A cylindrical face set to Tight Fit is rigid and deforms with the shank as a rigid body.
Example of a tight fit bolt connector
.
Shank Contact Faces . Select one or more cylindrical faces that are in contact with the shank. If you select multiple faces from a component, they must have the same axis and radius.
Material
Simulation selects Alloy steel from the SolidWorks Material library as bolt material by default.
The program does not maintain a link to the selected library. If you edit the library, the changes are not reflected for the bolt.
Strength Data
-
Known tensile stress area. Select this option if the tensile stress area (minimum area of the threaded section of the bolt) is known.
-
Calculated tensile stress area. Select this option to let the program calculate
the tensile stress area of the bolt.
-
-
Tensile Stress Area. Set the known tensile stress area for the bolt.
-
Thread Count. Enter the number of threads per inch, or per millimeter measured along the length of the fastener.
-
Bolt Strength. Set the strength of the bolt's material and its unit.
There are three commonly used strength parameters for bolts to estimate bolt failure. Yield strength, Ultimate Strength and Proof Strength (90% of Yield strength). The most commonly used parameter is the Yield strength of the bolt's material or grade, but users should choose a strength value that is most appropriate for the application.
Pre-load
Friction Factor (K)  . The program uses this factor to calculate
the axial force from a given torque.
. The program uses this factor to calculate
the axial force from a given torque.
Advanced Option
. Select the cylindrical faces of solid bodies or circular edges of shell surfaces from the middle components. For nonlinear studies, select a cylindrical face from a solid body.
Reference Geometry . For 1/2 symmetry bolts, select the plane or planar face of symmetry.
If you use symmetrical bolts, enter the total pre-load value of the bolt, and 1/2 or 1/4 of the total mass of the bolt according to the selected symmetry type. Also, when you list bolt forces after running a study, the results equal 1/2 or 1/4 of the total force.
Symbol Settings
-
Edit color. Select a color for the symbols.
-
Symbol Size  . Set the size of the symbols.
-
Show preview. Toggle the visibility of the bolt in the graphics area.
Notes
-
Available for static and nonlinear studies.
-
The bolt connector formulation is an approximation of a complex nonlinear behavior. It provides accurate results when the bolts are under tension. In loading scenarios where the bolts are under compressive loads, the axial forces of bolt connectors may not be accurate. In such cases, a decrease in preload bolt force can result in a "loosening" of the bolt and loss of contact between the bolt and the components. This behavior cannot be captured by the bolt connector formulation in Simulation. For these cases, model the actual bolt and define no penetration contact sets between the bolt and the components.
|
|
|
|
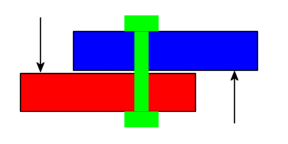
Define contact between these two faces. You can define a global, component, or a local contact.
|
You do not need to define contact when the faces are not initially contacting and do not come into contact during loading.
|