Example of a Clip for Auto-Routing and Auto-Sizing
This example demonstrates how to:
-
Create a clip with route points and an axis, to enable auto-routing through the clip.
-
Add filter data and multiple overlapping configurations, to enable auto-sizing of the clip when the cable diameter changes.
|
To create a clip for auto-routing:
-
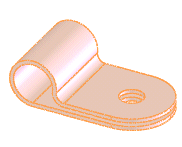
Create a model of the clip. Add any mate references you might need to position the clip in an assembly.
|
|
-
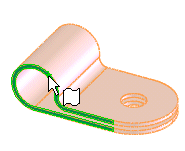
Create sketch points to locate the route points:
-
Open a sketch on a side face of the clip, as shown.
-
Click Point  (Sketch toolbar), and add a sketch point coincident with the center of the radius of the clip. (Sketch toolbar), and add a sketch point coincident with the center of the radius of the clip.
-
Close the sketch.
-
Repeat steps a to c on the opposite face.
|
|
-
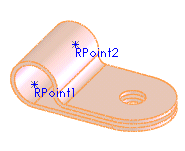
Add the first route point:
-
Click Create Route Point  (Routing toolbar). (Routing toolbar).
-
In the graphics area, select a sketch point and corresponding face from step 2.
The point and face are added to Selections in the PropertyManager.
-
Click  . .
A route point is added to the model.
-
Repeat step 3 to add a second route point.
|
|
-
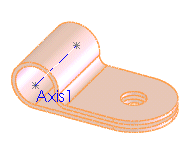
Click Axis  (Reference Geometry toolbar), add an axis between the two route points, then click . (Reference Geometry toolbar), add an axis between the two route points, then click .
-
Save the part.
When editing a route, you can auto-route through the clip by selecting the axis or by dropping the clip into the route.
|
|
To enable auto-sizing of the clip when the cable diameter changes:
-
Add filter data to the part:
-
Open a sketch on a side face of the clip.
-
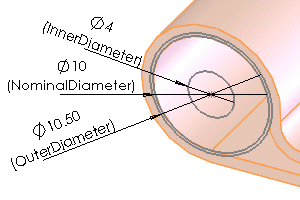
Sketch three circles concentric with the radius of the clip.
-
Dimension the circles, and name the dimensions:
-
NominalDiameter@FilterSketch, which is the nominal size of the clip.
-
InnerDiameter@FilterSketch, which is the diameter of the smallest bundle that the clip can accommodate.
-
OuterDiameter@FilterSketch, which is the diameter of the largest bundle that the clip can accommodate.
-
Close the sketch.
-
In the FeatureManager design tree, rename the sketch to FilterSketch.
|
|
-
Insert a design table to create the configurations. Include the following:
-
Filter data dimensions
-
Other dimensions that vary with the size of the clip (such as the radius of the clip, D3@Sketch1)
-
Names and values for the different clip sizes
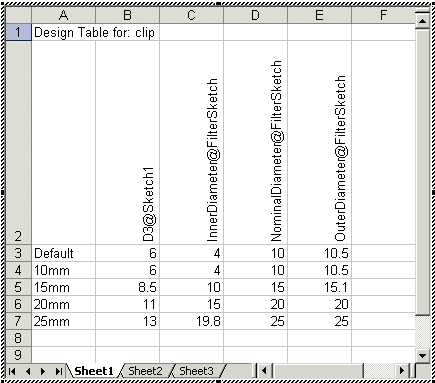
 The InnerDiameter of one size must be less than the OuterDiameter of the next size down, so that the complete set of configurations covers the whole range of sizes from largest to smallest with no gaps.
-
Click anywhere outside the table to close it.
To display the configurations added by the design table, select the Configuration tab  . Right-click the configuration name and select Show Configuration.
-
Save the part.
When editing a route, the clip automatically resizes to the appropriate configuration when the cable diameter changes.