The Connection Point PropertyManager appears when you create a connection point in a routing fitting (flange, elbow, electrical connector, etc.).
Selections
The PropertyManager controls the following properties:
 |
Select plane or face and a point |
Define the origin of a route by selecting one of the following:- Circular edge
- A circular edge.
- Circular face
- A circular face.
- Face or plane plus a sketch point or vertex
- The plane or face where the routing segment exits and the sketch point that defines the end of the adjoining route segment.
An axis is created normal to the plane or face. When the fitting is used in a routing sub-assembly, the routing segment is aligned to this axis. An arrow shows the direction in which the route exits the fitting. If the arrow is pointing in the wrong direction, select Reverse direction. 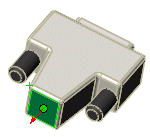 |
 |
Select route type |
Determines the type of routing material: Tube, Fabricated Pipe, or Electrical. For Electrical, also select a sub-type: - Harness
- Used in routes with a bundle of wires or cables.
- Cable/Wire
- Used in routes with a single cable.
- Conduit
- Used for components such as elbows, couplings, and end fittings. Use Auto Route to join the electrical components to the end fittings of the conduit route to indicate the path for the cables or wires through the conduit.
To attach wires or cable to a conduit route, the conduit end fitting must also contain a Harness or Cable/Wire connection point.
- Ribbon Cable
- For ribbon cable routes.
|
Parameters
 |
Nominal diameter |
For pipe, tube, and electrical conduit fittings: The nominal diameter of the port. This dimension corresponds to the NominalDiameter@FilterSketch dimension in pipe or tube parts. If the fitting has only one configuration, you can:
-
Type in a value.
- Click Select Pipe (or Select Tube), then browse to a pipe or tube and select a configuration to use its nominal diameter.
If the fitting has multiple configurations, specify the diameters in a design table, using column header Diameter@CPoint<n>.
For electrical connectors: Use the nominal diameter to calculate an approximate size of the cable or wire route. After you add the cables or wires to the route, you can adjust the size as needed.
|
| |
Stub length |
Specifies the default stub length to extend from the connector or fitting when it is inserted into routes. If set to 0, a stub length of 1.5 times the route diameter is used. You can set the stub length in design tables using the parameter StubLength@CPoint<n>. For ribbon cables, leave stub length at 0 or set it to a value greater than half the width of the cable to assure that folds made near the connector can be created properly. |
| |
Minimum straight length |
(For tubes only.) Specifies the minimum length of straight tubing required at the beginning and end of a route. You can set the minimum straight length in design tables using the parameter MinStraightLength@CPoint<n>. |
| |
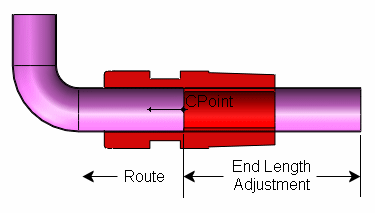
End length adjustment |
(For tubes only.) Specifies a value to add to the cut length of the tube. You can set the end length adjustment in design tables using the parameter EndLengthAdjustment@CPoint<n>. In the example below, an end length adjustment provides extra tube stock for the manufacturer to grip during the bending operation. After bending, the tube is cut at the connection point so the fitting can be added to the end of the route.
|
| |
Specification field name |
(For pipes and tubes only.) Filters choices of mating components with matching specifications. An optional field in the design table for parts with multiple configurations. |
| |
Specification value |
(For pipes and tubes only.) If the fitting has only one configuration, type the value associated with Specification field name. If the fitting has multiple configurations, specify the values in a design table, using column header Specification@CPoint<n>. |
| |
Port ID |
(For piping only.) Specifies the equipment routing ports used when you define a routing assembly from a P&ID file. Equipment routing ports determine routing connections. Without the port ID, SolidWorks connects equipment from the port with the closest matching diameter. |
| |
Additional internal wire length |
(For electrical only.) Specifies a value to add to the cut length of the cable to allow for strip back, termination, and so on. You can also add to the cut length of the cable by setting a slack percentage in Routing Options. The calculated cut length of cable is increased by the slack percentage to account for sagging, kinks, and so on, that may occur in actual installations.
|
| |
2D Schematic pin id |
- W
- (For ribbon cable only.) Sets the width of the cable.
- T
- (For ribbon cable only.) Sets the thickness of the cable.
- Select Cable
- (For ribbon cable only.) Sets W and T by selecting a ribbon cable from the Cable/Wire Library.
- Alignment
- (For ribbon cable only.) Specifies an edge with which to align the width of the cable.
- Switch pin1 position
- (For ribbon cable only.) Switches the side designated as the Pin1 side as shown in the preview. In the cable assembly, the Pin1 position is indicated by a red stripe along the cable.
|