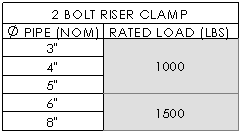
Annotation Tables
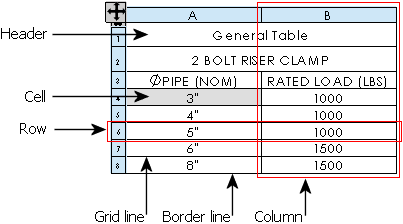
A table consists of cells arranged in rows and columns. Cells can contain either text or data that you can format individually.
Tables are available on the Table toolbar for:
Most tables have the following functionality:
-
Drag with the pointer
-
Snap to an anchor point
that you can set
-
Snap to lines and vertices in the sheet format
-
Use standard or custom templates
-
Add columns and rows and adjust their dimensions
-
Select and delete tables, columns, and rows
-
Split or merge tables
-
Merge or split adjacent cells
-
Sort the contents of columns
-
Zoom to selection
-
Control color in layers
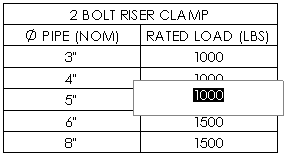
You can also edit items in most tables:
-
If you edit items in a table, automatic controls do not change them. To edit text, double-click the text and edit on screen. The Note PropertyManager appears, allowing you to format the text in addition to editing it.
-
If the cell value is parametrically linked to a part or assembly document, a warning appears, indicating that editing the value will sever the link. To restore the link in the future, delete the user-defined text from the cell, or right-click the cell and select Restore Original Value.
 The following procedures do not apply to every type of table.
To drag a table:
-
In the table PropertyManager, clear Attach to anchor point. (For Excel-based bills of materials, clear Use table anchor point in the Bill of Materials Properties dialog box.)
-
Hold Alt and drag the table from anywhere inside the table.
- or -
Drag the  icon in the upper left corner of the table.
To snap a table to sheet format entities:
-
Drag the table toward a vertical or horizontal line or a vertex in the sheet format.
-
As the edge of the table snaps to the line or point, release the pointer.
To add a column or row to a table:
In the column or row where you want to add the new column or row, right-click and select Insert, then select an option.
To select or delete a table, column, or row:
Right-click in the table and choose Select or Delete, then Table, Column, or Row.
If you select an entire table, press Delete to delete the table. If only a cell is selected, press Delete to delete the contents of the cell.
To format an entire table:
-
Click the icon in the upper left corner to select the table.
-
Format the table.
To view the header row:
-
Move the pointer over the  icon in the upper left corner of the table.
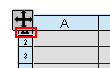
-
Click when the pointer changes to  .
.

You can see the header row and modify the text.

To split a table:
Right-click in the table and select Split:
-
Horizontally Above
-
Horizontally Below
-
Vertically Left
-
Vertically Right
To merge a table that has been split, right-click in a section of the table and select Merge Tables.
To merge or split adjacent cells:
-
Select the cells.
-
Right-click and select Merge cells or Unmerge a cell.