Assembly Constraints PropertyManager
The third step in creating a TolAnalyst study is to define how each part is constrained in the simplified assembly.
Assembly constraints are analogous to mates. Constraints are derived by the relationships between DimXpert features whereas mates are derived by the relationships between geometric entities. Additionally, constraints are applied in sequence, which can play an important role and have significant impact on the results.

Constraint Callouts
Use the constraint callouts to set constraints. The constraint callout  shows the constraint type followed by the feature to constrain. Only applicable constraint types are available.
For example a coincident constraint applied to Plane1 appears as  Plane1. Click 1, 2, or 3 to apply constraints in sequence on a primary (1), secondary (2), and tertiary (3) basis, much like the specification of datums in a feature control frame.
The constraint types include:
-
Coincident
-
 Concentric
-
 Distance
-
 Tangent
-
Pattern
To define assembly constraints:
-
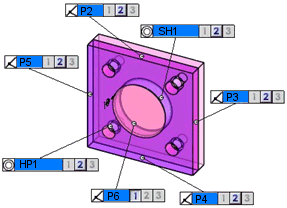
Under Tolerance Assembly, select a part to constrain in the simplified assembly. For example, in the following two-part assembly, you selected the part with a boss as Base part  in
Assembly Sequence
. Select the hole plate part to constrain it.
in
Assembly Sequence
. Select the hole plate part to constrain it.
 The base part shows as constrained
  because it is fixed as the origin part.
The constraint options appear with the primary (1) constraints enabled. The label for each constraint is the name of the feature on the selected part.
The constraint options for the hole plate are:
-
The plane, which is coincident with the base of the boss (plane P6)
-
The four outside planes (P2, P3, P4, and P5)
-
The center bore (Simple Hole SH1)
-
The four-hole pattern (Hole Pattern HP1).
The constrained feature names in the callout constraints are abbreviated in this topic. In the actual user interface, full feature names appear in callouts. For example, P2 and HP1 are spelled out in the user interface as Plane2 and Hole Pattern1.
-
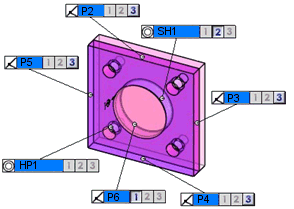
Set the primary constraint by clicking 1 in the callout constraint of plane P6.
The constraint is added to the Constraints list. The constraint callouts in the graphics area display updated primary and possible secondary constraints, as applicable.
When you apply a minimum of one constraint to each part in the simplified assembly, the message box turns from yellow to green and the  button is enabled.
-
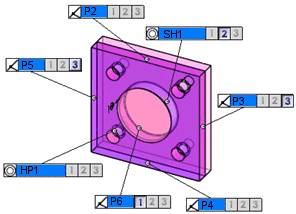
Set another constraint. For example, click 2 in the constraint callout of the center bore (Simple Hole SH1) to set this as a secondary constraint.
The constraint is added to the Constraints list. The constraint callouts display updated secondary and possible tertiary constraints, as applicable.
-
Set a tertiary constraint. For example, click 3 in the plane P3 constraint callout.
The constraint is added to the Constraints list. The constraint callouts display updated tertiary constraints, as applicable.
-
Click .
PropertyManager Options
Constraint Filters
Use the constraint filters to hide or show the constraint types.
-
Coincident 
-
Concentric 
-
Distance 
-
Tangent 
Show Patterns. Shows pattern constraints. When cleared, the constraints for each instance in the pattern are displayed.
|
|

|
|
Show Patterns selected
|
Show Patterns cleared
|
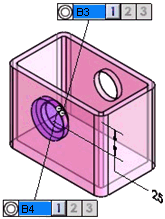
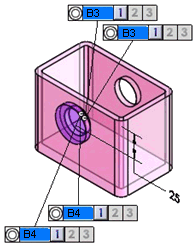
Use Smart Filter. Hides constraints that are not within close proximity to the considered feature.
|
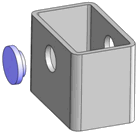
The plug is assembled to the box.
|
|
|
|
|
|
Smart Filter selected. Only the options to the near side hole appear for bosses B3 and B4.
|
|
|
|
|
|
Smart Filter cleared. The two boss features of the plug are given concentric constraints for both the near and far side hole of the box
|
|
Tolerance Assembly
Lists parts and their constraint status.
Constraints
Lists details about the constraints applied per part.
Supported Constraint Pairs
|
|
Boss
|
Cone
|
Hole*
|
Intersect line
|
Notch
|
Plane
|
Slot
|
Width
|
|
Boss
|
X
|
X
|
X
|
-
|
-
|
-
|
X
|
X
|
|
Cone
|
X
|
X
|
X
|
-
|
X
|
-
|
X
|
X
|
|
Hole*
|
X
|
X
|
X
|
-
|
X
|
-
|
X
|
X
|
|
Intersect line
|
-
|
-
|
-
|
X
|
-
|
X
|
-
|
-
|
|
Notch
|
-
|
X
|
X
|
-
|
X
|
-
|
X
|
X
|
|
Plane
|
-
|
-
|
-
|
X
|
-
|
X
|
-
|
-
|
|
Slot
|
-
|
X
|
X
|
-
|
X
|
-
|
X
|
X
|
|
Width
|
-
|
X
|
X
|
-
|
X
|
-
|
X
|
X
|
You can apply constraints between patterns of holes*, notches, or slots.
*: Hole includes Cylinder, Counterbore, Countersink, and Simple Holes
Legend:
X: Supported
-: Not supported or not applicable