An animation study uses linear interpolation to compute the motion transformation between two points. If you mate a component to a curve, the computed motion may vary from the intended motion.
To address this problem, do one of the following:
- Use a distance mate, which measures the distance along the curve instead of using linear interpolation. Use the distance value to define the new position.
- Add intermediate key points to refine the motion.
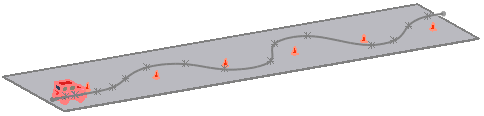
Mating a car assembly to a curve to display the motion of the car driving around traffic cones
To create an animation by mating assemblies to curve mates:
- Open an assembly and create curve for the assembly to track.
- On the Motion Study 1 tab, set the time bar to 00:00:00.
- Click Mate
 (Assembly toolbar) or .
- In the Mate PropertyManager, if you use a single entity curve in Step 1:
- Under Mate Selections, click in Entities to Mate
 and select the curve and a point on the assembly.
- Select Coincident
 for the mate type.
- In the Mate PropertyManager, if you use a multiple entity curve in Step 1:
- Select Path Mate
 under Advanced Mates.
- Under Mate Selections, click in Component Vertex and select the vertex to mate from a point on the assembly.
- Click in Path Selection, click SelectionManager, and select the path for the mate.
- Click
 .
.This mate keeps the assembly tracking along the curve.
 |
 |
| No mate |
Coincident mate to the curve |
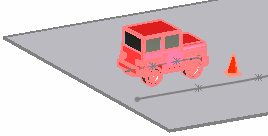
- Click Mate .
- Select the curve and select the rear of the assembly.
- Add a Distance
 mate as close to 0 as possible. This mate controls the distance the assembly moves from the start point of the curve.
- Click .
- Drag the time bar to the end time. For example, use 00:00:10.
- Edit the distance mate to set the distance the car travels from the start point. For example, use 100 inches.
- Click
 Play to view the animation.
Video: Mate to Curve Animation