To display areas of a part that are less than and greater than a specified thickness range:
- In an open part, click Thickness Analysis
 (Tools toolbar) or .
- In the PropertyManager, under Analysis Parameters:
- Set a value for Target thickness
 .
.
- Select Show thick regions.
- Set a value for Thick region limit to define the upper limit of the thickness range.
- If necessary, select Treat corners as zero thickness to disregard sharp corners of the part as thin. All corners are treated as having uniform thickness.
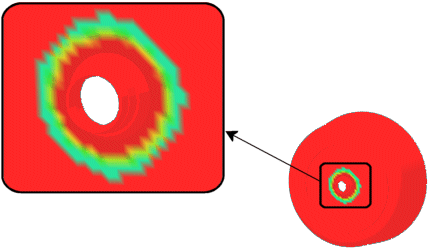
Example of Treat Corners as Zero Thickness
- Under Color Settings, set the color range:
- Select Full color range to show the part in various colors shown in the Thickness scale.
- Clear Full color range then click Edit Color to show the part in different shades of the Target thickness color and Thick region limit color.
- Under Color Settings, select one of the following Thickness scale display options:
| Option |
Description |
|---|
| Continuous |
Uses a gradient range. |
| Discrete |
Uses a discrete number of color bands. Set a value. |
- (Optional) Under Performance/Accuracy:
- If the part is a multibody part, select a body in the graphics area. Thickness Analysis can be performed on only one body at a time. The body name appears under Body for analysis
 .
.
- Select faces in the graphics area to perform Thickness Analysis on the selected entities only. The face names appear under Faces for local analysis
 .
.
- Move the Resolution slider to adjust the color precision used for the results. Higher resolution settings take a longer time to calculate the results.
- Click Calculate.
The part is displayed in various shades to indicate the different thicknesses.
Drag the pointer over the part to see the tooltip display thickness values.