With Microsoft Windows® 8.1, you can print directly to a 3D Printer from the SOLIDWORKS software.
This procedure describes 3D printing for printers that use the Microsoft Windows 8.1 print driver.
If your 3D printer manufacturer uses the SOLIDWORKS 3D Print API, the 3D Printing dialog box opens to assist you in printing.
After you set the print options in the Print3D PropertyManager, Windows 8.1 handles all communication with the 3D printer. A preview of the print bed and the model's location within the print bed lets you modify settings before committing to a 3D print job.
To use the Print3D PropertyManager for the Windows 8.1 print driver, you must be on a computer that runs the Windows 8.1 operating system. However, you can still use the Save to File capability to save your model to a 3D printing format.
To print to a 3D printer that uses the Microsoft Windows 8.1 print driver:
- Click .
- Under Printer, select a printer from the list of installed 3D printers that use the Windows 8.1 print driver.
The dimensions of the printer you select are shown in Print volume.
Printer description shows a read-only description of the printer, which you can copy and paste.
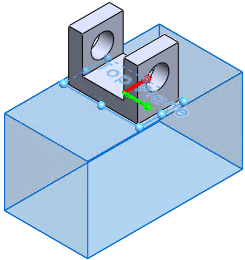
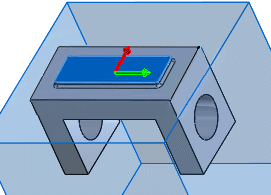
- Under Print Bed Location, select a plane to act as the reference plane of the model.
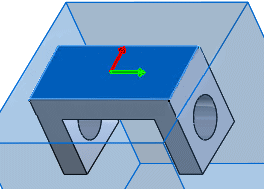
A preview shows the model within the print volume. If the model falls outside the print volume, click  to reverse the orientation.
 |
 |
| Top plane selected |
Print volume orientation reversed |
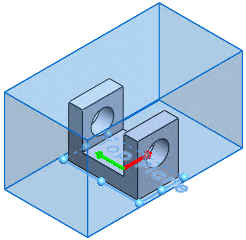
If you select a model face or plane before opening the Print3D PropertyManager, it appears as the reference plane.
If your plane selection results in part of the model extending beyond the print volume, you cannot print. The area outside the print volume is highlighted. If you click  , a warning appears in the Message area.
 |
 |
| Recessed face selected in model |
Reference print preview |
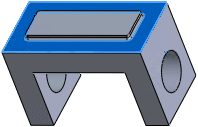
In the example above, an extrusion extends beyond the print volume. You can solve the problem by selecting the face of the extrusion.
 |
 |
| Extrusion face selected in model |
Reference plane preview |
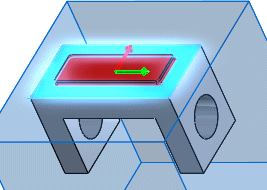
Or you can suppress the feature that extends beyond the print volume.
 |
 |
| Extrusion suppressed |
Reference plane preview |
- Under Model orientation, use the controls to position the model within the print volume.
Use the Print Bed Angle control to rotate the print volume around the model:

Use the Translation controls  and
and  to move the print volume in the direction of the axis.
- Under Options, select the following:
- Job Quality
- Infill percentage
- Include supports
When selected, supports are added for parts of the model that overhang the print bed.
The default is to include supports.
- Include raft
When selected, the print output is built on top of a raft of disposable material that you can remove after printing.
The default is to not include a raft.
The printer you selected in step 2 determines how these options are applied.
- Click Printer Properties to view properties specific to the selected printer.
These properties are provided by the printer manufacturer.
- To print the model, click .