Hide Table of Contents

Adding an Internal End Cap

To add an internal end cap:

  1. Open install_dir\samples\whatsnew\weldments\inset_with_angled_end_face.sldprt.
  2. Click End Cap (Weldments toolbar) or Insert > Weldments > End Cap.

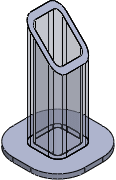
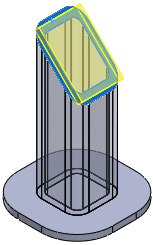
  3. In the End Cap PropertyManager, under Parameters, for Face, select the slanted face of the structural member.

    The preview shows the end cap.
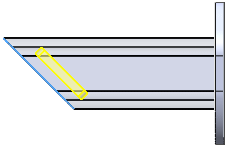
  4. Click Front (View toolbar) to have a better view of how the end cap controls affect the end cap.

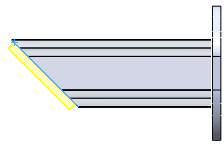
  5. For Thickness direction, select Internal .
  6. For Thickness, type 0.25in and for Inset Distance, type 0.33in.
  7. Under Offset, select Offset Value and type 0.0125in.
  8. Select Corner Treatment.
  9. Select Fillet and type 0.125 for Fillet Radius.

  10. Click .


Provide feedback on this topic

SOLIDWORKS welcomes your feedback concerning the presentation, accuracy, and thoroughness of the documentation. Use the form below to send your comments and suggestions about this topic directly to our documentation team. The documentation team cannot answer technical support questions. Click here for information about technical support.

* Required

 
*Email:  
Subject:   Feedback on Help Topics
Page:   Adding an Internal End Cap
*Comment:  
*   I acknowledge I have read and I hereby accept the privacy policy under which my Personal Data will be used by Dassault Systèmes

Print Topic

Select the scope of content to print:

x

We have detected you are using a browser version older than Internet Explorer 7. For optimized display, we suggest upgrading your browser to Internet Explorer 7 or newer.

 Never show this message again
x

Web Help Content Version: 2015 SP05

To disable Web help from within SOLIDWORKS and use local help instead, click Help > Use SOLIDWORKS Web Help.

To report problems encountered with the Web help interface and search, contact your local support representative. To provide feedback on individual help topics, use the “Feedback on this topic” link on the individual topic page.