| |
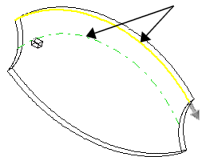
Pattern Direction |
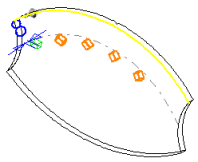
Select a curve, edge, sketch entity, or select a sketch from the FeatureManager to use as the path for the pattern. If necessary, click Reverse Direction  to change the direction of the pattern. The example below uses the upper edge of the model as the Pattern Direction for Direction 1. to change the direction of the pattern. The example below uses the upper edge of the model as the Pattern Direction for Direction 1.
|
 |
Number of Instances |
Set a value for the number of instances of the seed feature in the pattern. |
| |
Equal spacing |
Sets equal spacing between each pattern instance. The separation between instances depends on the curve selected for Pattern Direction and on the Curve method. |
| |
|
 |
 |
| |
|
Equal spacing check box cleared
|
Equal spacing check box selected |
 |
Spacing (Available if you do not select Equal spacing) |
Set a value for the distance between pattern instances along the curve. The distance between the curve and the Features to Pattern is measured normal to the curve.
|
| |
Curve method |
Defines the direction of the pattern by transforming how you use the curve selected for Pattern Direction. Select one of the following:
|
Transform curve
|
The delta X and delta Y distances from the origin of the selected curve to the seed feature are maintained for each instance.
|
|
Offset curve
|
The normal distance from the origin of the selected curve to the seed feature is maintained for each instance.
|
|
| |
Alignment method |
Select one of the following:
|
Tangent to curve
|
Aligns each instance tangent to the curve selected for Pattern Direction.
|
|
Align to seed
|
Aligns each instance to match the original alignment of the seed feature.
|
|
| |
Example of Curve method and Alignment method selections
|
| |
|
 |
 |
| |
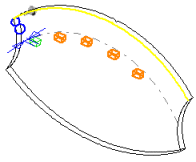
|
Curve: Transform curve
Alignment: Align to seed
|
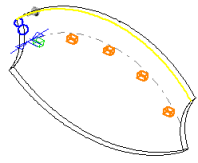
Curve: Offset curve
Alignment: Align to seed
|
| |
|
|
| |
|
 |
 |
| |
|
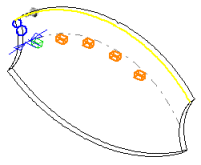
Curve: Transform curve
Alignment: Tangent to curve
|
Curve: Offset curve
Alignment: Tangent to curve
|
| |
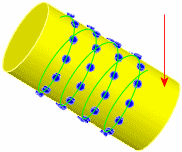
Face normal (For 3D curves only) |
Select the face on which the 3D curve lies to create the curve driven pattern.
|
| |
|
 |