| Start constraint and End constraint |
Applies a constraint to control tangency to the start and end profiles. Select one of the following:
|
Default
|
(Available with three profiles minimum). Approximates a parabola scribed between the first and last profiles. The tangency from this parabola drives the loft surface, which results in a more predictable and natural loft surface when matching conditions are not specified.
|
|
None
|
No tangency constraint (zero curvature) is applied.
|
|
Direction Vector
|
Applies a tangency constraint based on a selected entity used as a direction vector. Select a Direction Vector  , then set the Draft angle and Start or End Tangent Length. , then set the Draft angle and Start or End Tangent Length.
|
|
Normal to Profile
|
Applies a tangency constraint normal to the start or end profile. Set the Draft angle and Start or End Tangent Length.
|
|
Tangency to Face
|
(Available when attaching a loft to existing geometry). Makes the adjacent faces tangent at the selected start or end profile.
|
|
Curvature to Face
|
(Available when attaching a loft to existing geometry). Applies a smooth, visually appealing curvature continuous loft at the selected start or end profile.
|
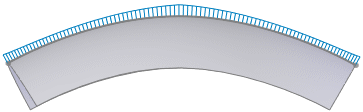
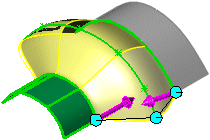
Preview of loft with no start or end constraints applied
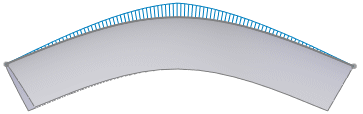
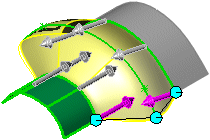
Loft with Curvature to Face applied
|
| Next Face (Available with Tangency to Face or Curvature to Face selected for Start or End constraint) |
Toggles the loft between available faces. |
| Direction Vector (Available with Direction Vector selected for Start or End constraint) |
Applies a tangency constraint based on a selected entity used as a direction vector. The loft is tangent to the selected linear edge or axis, or to the normal of a selected face or plane. You can also select a pair of vertices to set the direction vector. |
| Draft angle (Available with Direction Vector or Normal to Profile selected for Start or End constraint) |
Applies a draft angle to the start or end profile. If necessary, click Reverse Direction  . You also apply a draft angle along guide curves. . You also apply a draft angle along guide curves.
|
| Start and End Tangent Length (Not available with None selected for Start or End constraint) |
Controls the amount of influence on the loft. The effect of tangent length is limited up to the next section. If necessary, click Reverse Tangent Direction  . .
|
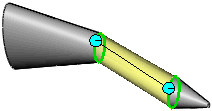
| Apply to all |
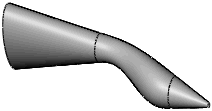
Displays one handle that controls all the constraints for the entire profile. Clear this option to display multiple handles that permit individual segment control. Drag the handles to modify the tangent length.
 |
 |
| Apply to All selected One handle per profile controls the constraints for that entire profile.
|
Apply to All cleared Multiple handles per profile control the weight of the constraints at individual segments within each profile.
|
|