This example demonstrates how to create a clip with route points and an axis to enable auto-routing through the clip.
To create a clip for auto-routing:
-
Create a model of the clip. Add any mate references you might need to position the clip in an assembly.
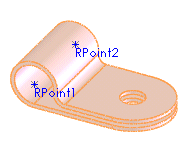
- Create sketch points to locate the route points:
- Open a sketch on a side face of the clip, as shown.
- Click Point
 (Sketch toolbar), and add a sketch point coincident with the center of the radius of the clip.
- Close the sketch.
- Repeat steps a to c on the opposite face.
- Add the first route point:
- Click Create Route Point
 (Routing toolbar).
- In the graphics area, select a sketch point and corresponding face from step 2.
The point and face are added to Selections in the PropertyManager.
- Click
 .
.A route point is added to the model.
- Repeat step 3 to add a second route point.
- Click Axis
 (Reference Geometry toolbar), add an axis between the two route points, then click .
- Save the part.
When editing a route, you can auto-route through the clip by selecting the axis or by dropping the clip into the route.