Comments

You can add text comments to items in the FeatureManager design tree (assemblies, components, features, and sketches) in the manner of Post-it® notes. You can apply font styles to the text, specify a background color, add a timestamp, and insert an image or screenshot. You can click Show on open to automatically open the comment in the View All Comments dialog box the next time you open the file.
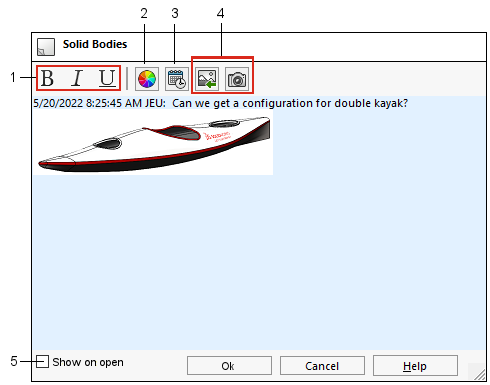


1 Bold, italics, underline font styles 4 Insert image or screenshot
2 Background color 5 Show comment in View All Comments dialog box on open
3 Add timestamp    

When you add the first comment to a document, a Comments folder is created in the FeatureManager design tree. Comments display in tooltips, both in the Comments folder and for the item in the FeatureManager design tree.

Comment tooltips show the text <image> to indicate that the full comment contains an image. The tooltip name matches the name from the Comment background colors section in the Model Display dialog box.

Adding Comments

You can add comments to items in the FeatureManager design tree and to items in the ConfigurationsManager tab. You can apply font styles to the text, specify a background color, add a timestamp, and insert an image or screenshot.

You can add only one comment per item. You can add multiple entries to a comment.

To add comments:

  1. Right-click an item in the FeatureManager design tree or the graphics area and click Comment > Add Comment .
  2. In the comment dialog box, enter text.
  3. Optional: You can take these optional actions:
    1. Add bold , italics , and underline to text.
    2. Click Background color to choose different background colors. Click Options in the Background colors tab to open the Tools > Options > Document Properties > Model Display dialog box where you can specify the Comment background colors. You can customize the names or reset all names back to the default. You cannot customize the colors.

    3. Click Add timestamp to add the date and time.
      To add a timestamp automatically to comments, click Tools > Options > System Options > FeatureManager. Under Comments, select Automatically add timestamp to comments.
    4. Click Insert image or Insert screenshot to add these to the comment.
    5. Click Show on open to automatically open the comment in the View All Comments dialog box the next time you open the file.
  4. Click Ok.

Adding Stand-alone Comments

You can add stand-alone comments that are not attached to a feature or node in the FeatureManager design tree.

To add stand-alone comments:

  1. In the FeatureManager design tree, right-click the top node and click Comment > Add Comment.
  2. In the comment dialog box, enter the comment and click Ok.
    The stand-alone comment is added to the Comments folder in the FeatureManager design tree.
    If the Comments folder already exists, you can right-click it and click Add Comment to add stand-alone comments.

Comments in the FeatureManager Design Tree

You can add comments to the following nodes in the FeatureManager design tree:

  • Annotation views
  • Block
  • Folders
  • Mates (all types)
  • Mate folder or Mate group
  • Mate references
  • Material
  • Selection sets
  • Sensors
  • Sheet metal nodes
  • Solid bodies folder
  • Surface bodies folder
You can also add comments in the ConfigurationManager tab. The comments appear in the Configurations Comment folder.

Turning on Comment Indicators

You can enable comment indicators in the FeatureManager design tree display to locate the comments more easily.

To enable comment indicators:

  1. In the FeatureManager design tree, right-click the top node.
  2. Click Tree Display > Show Comment Indicator.

    Visual indicators appear in the FeatureManager design tree to indicate if a comment exists.


    The color circle matches the color of the comment.

Editing Comments

To edit comments:

  1. Right-click an item in the FeatureManager design tree that has a comment or a comment in the Comments folder and click Comment > Edit Comment .
    When you right-click a comment, a context toolbar and shortcut menu appear so you can directly edit features when you read the comments.

  2. Edit the comment, then click Ok.

Deleting Comments

To delete a comment:

Right-click an item in the FeatureManager design tree that has a comment and click Comment > Delete Comment, then click Yes to confirm.

Viewing All Comments

You can view all comments in a model in the Comments dialog box.

To view all comments:

  1. Right-click the Comments folder in the FeatureManager design tree and click View All Comments.
    The Comments in model_name dialog box appears.

  2. Optional: You can do the following:
    1. In the Show on open column, click the check boxes to automatically open a comment the next time you open the file.
    2. In the Sort by menu, sort the comments by Hierarchy, Name, or Date.
    3. In the Show menu, filter the comments to show in the dialog box.

    4. Click Ok.

Viewing and Editing Comments in PropertyManagers

You can view and edit the comments of a feature in PropertyManagers.

To view and edit comments in PropertyManagers:

  1. Click Tools > Options > System Options > FeatureManager.
  2. In the dialog box, under Comments, select Show Comments in PropertyManager.
  3. In the FeatureManager design tree, select a feature that has a comment and click Edit Feature .
  4. In the PropertyManager, under Comment, click Edit.
    The comment dialog box opens.
  5. Modify the comment and click Ok.
  6. Click .