Filling Data Automatically in Table Cells
You can automatically fill cells with custom data that follows a pattern or based on data in other cells. A special grip point, called auto-fill grip point, in the lower right corner of the cell, lets you automatically add incremental values in cells by dragging, just as in Excel. You can also combine text and numbers in the same cell.
To automatically fill cell data, click and drag the light blue grip point to the desired cell and click to place the data.

You can use the auto-fill grip point for the following operations:
- Copy cell contents from a specified cell to a range of cells. The same value appears in the adjacent cells of the table.
- Automatically fill Incremental data, such as consecutive numbers or consecutive dates.
- Automatically fill data from a series of custom values. You can define your own customized lists which you can use later to automatically fill adjacent table cells. The application provides a set of predefined lists, such as days of the week and months.
Optionally, you can lock a specified range of cells to prevent content or format change during automatic fill.
Example:
Define a custom list for all materials available for a project. You can get the entire list whenever it is necessary by dragging. When you type a material name in a cell and drag the grip point then other materials are filled in the cell automatically with remaining values.
You can do the following:
- Copy cell contents from a selected cell to adjacent cells
- Automatically increment cell contents with consecutive numbers
- Automatically increment cell contents with a step
- Automatically fill cell contents with custom data
The basic workflow for working with custom lists includes the following steps:
- Define the custom list that contains items to use to automatically fill cells later.
In the Custom List dialog box, select New List.
- Populate the custom list.
Use one of the following methods to populate custom lists:
- Manually typing the data
- Importing a range of cells
- Importing data from a CSV file
- Optionally, lock cells that you want to protect.
Lock the content or the format of a cell. Lock options are available in the cells context menu.
- Apply the custom list.
Once you defined the custom list, you can use it to automatically fill table cells by dragging the autofill grip point up, down, left, or right.
To autofill incremental values within a table:
- Select the starting cell.
- Click and drag the autofill grip point across a row or a column to define the autofill area.
Specified cells are automatically filled with consecutive numbers.
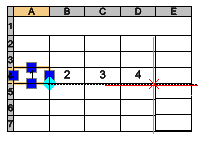
-
Click to place the data.
Tip: The grip point works with numbers as well as with dates.
To autofill incremental values with a step:
- Select two adjacent cells with the values to increment. For example, 1 and 3. The difference between the values is the incremental step.
- Click and drag the autofill grip point to define the autofill area.
Specified cells are automatically filled with numbers with the defined incremental step.
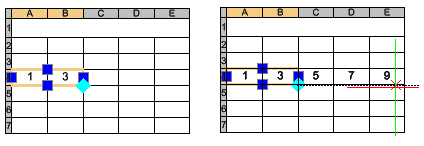
- Click to place the data.
To automatically fill cells based on a custom list:
- Double-click a cell and type an item name from the list.
- Click and drag the autofill grip point across a row or a column to define the autofill area.
Specified cells are automatically filled with consecutive items from the list.
To define a custom list:
- Select a table cell.
- Right-click and select Custom List from the context menu.
- In the Custom List dialog box, select New List.
- To populate the custom list, do one of the following:
- Manually. In the List Items field, type each item of the custom list on a new line. To separate one item from another, press Enter.
- Import values from a cell range. Click Import cells. In the graphics area, specify the range of cells from which to import values.
- Import values from .csv file. Click Import and select the file.
Available items are displayed in the List Items field. The list also sets the order.
- Click Add.
The list of items appears below the existing lists.
To delete a custom list:
- Select a table cell.
- Right-click and select Custom List from the context menu.
- In the Custom List dialog box, select the list to delete.
Note: You cannot remove or modify predefined lists.
- Click Delete.
To lock a range of table cells:
- In the graphics area, select the cells to protect.
- Right-click and select Locking from the context menu, then specify the locking options:
- Content Locked.
- Format Locked.
- Content and Format Locked.
The content or format of the locked cells, according to the selected locking option, does not change when you are automatically inserting incremental data.
Command: EditTableCell
Menu: Modify > Entities > Table Cells