You can model flexible or folded ribbon cable routes.
| Flexible |
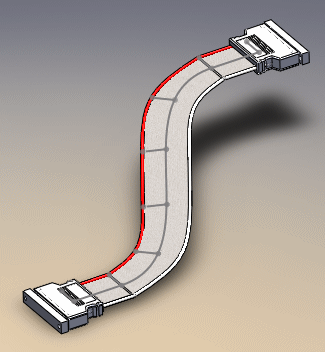 |
| Folded |
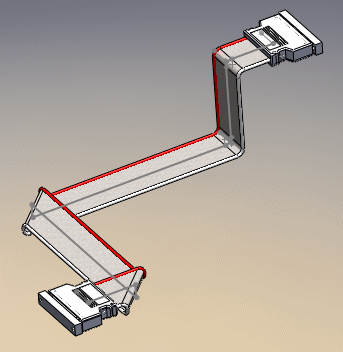 |
To create ribbon cable routes, you need:
-
Ribbon cable connectors and clips. You can create your
own ribbon cable connectors and clips or use the sample parts provided in the
Design Library. Use clips and virtual clips to define the path of the route. To
access sample connectors and clips, go to the Design Library tab of the Task
Pane and browse to routing\electrical\ribbon
cable.
-
Ribbon cable. You can define your own ribbon cable, or
use the sample cables provided in the cable/wire library. Click and click Open an existing library. In the
dialog box, select Ribbon Cable Library
to see the predefined cables or to add your
own.
Ribbon
cable clips work the same way as clips in route assemblies but also require
a specified coordinate system.
To route a ribbon cable:
- Pre-place ribbon cable clips and connector sockets in the main
assembly.
- To start the ribbon cable route, insert a valid ribbon cable
connector into the main assembly.
- Using Auto Route
 (Electrical toolbar), specify
the path by selecting connectors and clips.
(Electrical toolbar), specify
the path by selecting connectors and clips.
See topics about Creating Flexible and Folded
Ribbon Cable Routes.
The following are limitations within the ribbon cables environment:
- Internal connectivity
is not supported. Therefore, you cannot assign wires, you cannot use from-to
lists, and connector tables do not show any connectivity.
- You must use the Auto
Route PropertyManager to specify the path for ribbon cable
routes. You cannot use tools from the Sketch toolbar and menus.
-
Re-route spline is not available in the
Auto Route PropertyManager. You must
set up route geometry prior to routing, by pre-placing clips and connector
sockets.
- The Repair Route command
is not supported.
- Use of fixed-length
standard cables is not supported.
- Drawings of the flattened route do not show inline connectors.
(You can show inline connectors in drawings of the 3D model of the route.)