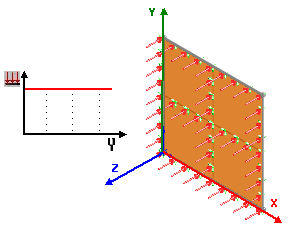
Calculate the peak UZ displacement and bending stress (SY or SX) at the
center of a simply-supported square plate of side 10 m and thickness 1.0 m subjected to a
steady-state harmonic pressure.

|
File Name
|
Open drive
letter:\Users\Public\Public Documents\SOLIDWORKS\SOLIDWORKS
version\samples\Simulation
Examples\Verification\NAFEMS_R0016_Test21H.SLDPRT.
|
|
Study Type
|
Three shell studies are created:
| Study Name |
Study Type |
| Modal_Damping |
Linear Dynamics - Harmonic (modal
damping) |
| Rayleigh_Damping |
Linear Dynamics - Harmonic(Rayleigh
damping) |
| Frequency |
Frequency |
|
|
Mesh Type
|
Shell mesh for all three studies. Shell thickness = 1.0 m - Thick
shell formulation.
|
|
Material Properties
|
Linear elastic isotropic. Modulus of elasticity (E) = 2 x
1011 N/m2, Mass density (ρ) = 8000 Kg/m3, Poisson's
ratio (ν) = 0.3.
|
|
Load
|
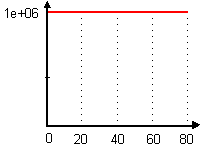
A harmonic pressure sweep is applied on the whole plate. Horizontal
axis is frequency (Hz) and vertical axis is maximum pressure (N/m2). F = Fo sin ωt; Fo = 106 N/m2; ω = 2 π f ; f = 0
to 80 Hz.

|
|
Harmonic Options
|
- Number of mode shapes =
16
- Operating frequency
limits = 0 - 80 Hz
|
|
Damping
|
-
Modal_damping: 2% of critical damping for all 16 modes
-
Rayleigh_damping: Mass coefficient a0 = 5.772, Stiffness
coefficient a1 = 6.929 x 10 -5
|
Results
| |
Reference |
SOLIDWORKS
Simulation with Modal _Damping |
SOLIDWORKS
Simulation with Rayleigh_Damping |
| Peak UZ displacement at center |
58.33 mm at f = 45.90 Hz |
59.57 mm at f = 46.42 Hz |
59.57 mm at f = 46.42 Hz |
| Peak SY bending stress at center |
800.8 N/mm2 at f = 45.90 Hz |
815.6 N/mm2 at f = 46.36 Hz |
806.6 N/mm2 at f = 46.36 Hz |
Reference
NAFEMS, Publication R0016, The International
Association for the Engineering Analysis Community, "Selected Benchmarks for Forced
Vibration", Test 21H, 1989.