You
can use the same techniques to manually trace lines.
To modify
autotraced lines:
-
In the
Basic tab, under Tracing Options, click New
 .
.
-
In the graphics area, select a line, and press Enter to confirm.
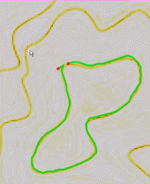
The line color changes from yellow to green.
If the Tracing
Options in the Task Pane become unavailable (grayed out),
follow the prompts in the Command Window.
-
To split a line segment:
-
In the graphics area, select a point where you want to
split a line segment.
-
Under Tracing
Options, click Split
 or in the Command
Window, enter S for Split.
-
In the Command Window, enter S to stop line tracing.
The line segment is removed.

-
In the Command Window, enter N to continue to the next line segment.
-
To close the gap in a line:
-
Under Tracing
Options, click Join
 or in the Command
Window, enter J for Join.
-
Click a red dot at the first line segment.
-
Click a red dot at the second line segment.
-
In the Command Window, enter Y for Yes, to join the ends of the line segments.
-
To assign height elevation:
-
In the graphics area, select a point where you want to
assign elevation.
The line color changes from green to blue.
-
Under Tracing
Options, enter a value for Line Elevation.