Geometric Tolerancing
The geometric tolerance symbol adds geometric tolerances to parts and
drawings using feature control frames. The SolidWorks software supports
the ANSI Y14.5 Geometric and True Position Tolerancing guidelines.
You can place geometric tolerancing symbols, with
or without leaders, anywhere in a drawing, part, assembly, or sketch,
and you can attach a symbol anywhere on a dimension line.

The Properties
dialog box for geometric tolerance symbols offers selections based on
the symbol you choose. Only the attributes that are appropriate for the
selected symbol are available.
A geometric tolerance symbol can have any number
of frames.
The pointer changes to  when it is
on a geometric tolerancing symbol.
You can add multiple symbols without closing the
dialog box.
You can display multiple leaders.
You can
add more leaders to an existing symbol by holding down Ctrl
and dragging a leader attachment point.
To create geometric tolerancing symbols:
Do one of the following:
Set options
in the Properties
dialog box and the Geometric
Tolerance PropertyManager.
As you add items, a preview is displayed.
Click to place the symbol.
Click as many times as necessary to place
multiple copies.
If the symbol has a leader, click once to
place the leader, then click a second time to place the symbol.
 When you insert geometric tolerance symbols that use Auto Leader
  , you must
hover over the entity to highlight the entity and to attach the leader.
The leader does not appear until you hover over the entity.
You can change text and other items in the
dialog box for each instance of the symbol.
While dragging the symbol and before placing
it, hold down Ctrl. The note stops
moving, but the leader continues, lengthening the leader. While still
holding Ctrl, click to place the
leader. Click as many times as necessary to place additional leaders.
Release Ctrl and click to place
the symbol.
Click OK.
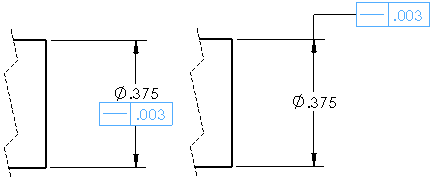
To attach
geometric tolerance symbols to dimensions:
Create
a geometric tolerance symbol.
Drag and
drop the symbol onto a dimension.
If you move the symbol after attaching it to a dimension, you can drag
it outside the dimension.
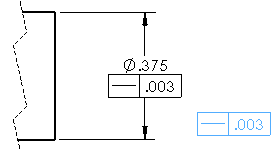
To detach
geometric tolerance symbols from dimensions:
Select
the geometric tolerance symbol.
Click the
symbol handle, then drag the symbol away from the dimension.

To create
an unattached geometric tolerance symbol from a symbol attached to a dimension:
Press Ctrl and drag the attached symbol to
another area.

Related Topics
DimXpert
Auto Dimension Scheme PropertyManager
DimXpert
Geometric Tolerance Options