Thermostat
For transient thermal studies, all heat power and heat flux assignments
can be controlled by a thermostat mechanism defined by a desirable temperature
range at a vertex. For each solution step, the status of the heat power
or flux condition (on/off) is decided based on the temperature at the
specified vertex in the previous step. You can use multiple thermostats
in a study.
If the value of the heat power or heat flux is positive, the device
acts as a heater that is turned on during the next solution step if the
current temperature of the sensor (vertex) is equal to or lower than the
lowest desired temperature. Otherwise, the heating condition is turned
off.
If the value of the heat power or heat flux condition is negative, the
device acts as a cooler that is turned on during the next solution step
if the current temperature of the sensor (vertex) is equal to or higher
than the highest desired temperature. Otherwise, the cooling condition
is turned off for that step.
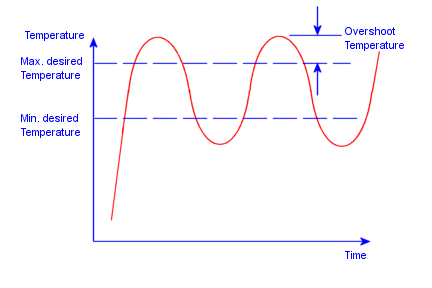
If the thermostat is working properly, the graph of temperature versus
time at the thermostat location should oscillate as shown in the figure
below, provided that adequate solution time is used. If the overshoot
temperature on one or both sides of the bounds is large, then modify the
properties of the study to use a smaller time step and re-run the study.

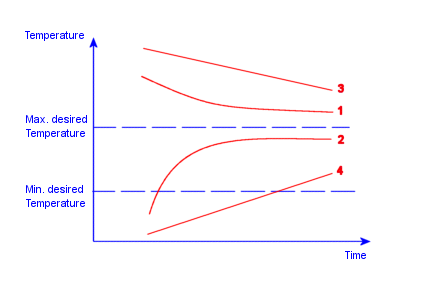
If the temperature at the thermostat location converges to a temperature
outside or inside the desired range (as in curves 1 and 2), the specified
thermostat does not play a role in controlling the heat source. In this
case, change the heat source, other thermal loads or restraints, material
properties, or the location of the thermostat.

If the temperature at the thermostat location approaches one side of
the temperature bounds with a slope without crossing it (as in curves
3 and 4), increase the solution time and rerun the study.
To specify a thermostat-controlled heat flux:
In a transient thermal study, right-click the
Load/Restraint folder and select
Heat Flux.
The Heat
Flux PropertyManager appears.
In the graphics area, select the faces to which
the heat flux is applied.
Under Heat Flux,
do the following:
Set Units
to the desired system of units.
Type a value for the Heat
Flux  .
.
Check Thermostat.
The Thermostat
property box appears.
Click inside the Sensor
selection box to activate it and select a vertex to specify the thermostat
location.
Under Cut
off details, select a temperature unit and type the upper and lower
bound temperatures  .
.
Click OK.
To specify a thermostat-controlled heat power:
In a transient
thermal study, right-click the Load/Restraint
folder and select Heat Power.
The Heat
Power PropertyManager appears.
In the graphics area, select the entities to which
the heat power is applied.
Under Heat Power, do the following:
Set Units
to the desired system of units.
Type a value for the Heat
Power  .
.
Check Thermostat.
The Thermostat
property box appears.
Click inside the Sensor
selection box to activate it and select a vertex to specify the thermostat
location.
Under Cut
off details, select a temperature unit and type the upper and lower
bound temperatures  .
.
Click OK.