Deform - Surface Push Options
Surface push deform modifies surfaces of target bodies by pushing tool bodies into them. You select a customizable pre-built tool body, such as a polygon or sphere, or use your own tool bodies. Use the triad callout in the graphics area to size the tool body. Drag the triad  or set values in the PropertyManager to control tool body movement.
The surface push deform approximates the surfaces of the tool bodies, while maintaining the identities of the surfaces of the target bodies (the number of faces, edges, and vertices remains unchanged in the final target body).
Surface push deform provides more efficient control of the deform shape as compared to point deform. It is also a predictable way to create specific features based on tool body shapes.
Use surface push deform to design free-form surfaces, tooling, plastics, soft packaging, sheet metal, and other applications where it is useful to incorporate the characteristics of tool bodies into existing designs.
See Deform Feature - Surface Push Examples for more examples.
|
|

|
|
|
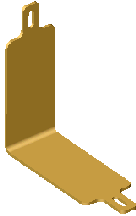
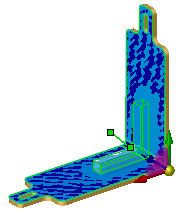
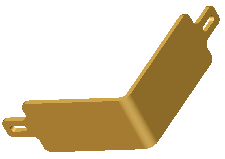
Initial target body
|
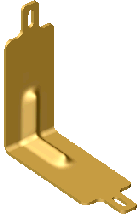
Preview of L-shaped Tool Body  applied applied
|
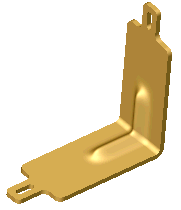
Surface push deform creates a rib-like groove
|
Push Direction
-
Deform direction. Sets the direction of push (deform). Select a sketch line, linear edge, planar face, plane, or two points or vertices. If necessary, click Reverse deform direction  .
.
 If you do not see a surface push preview, click Reverse deform direction . Failed surface push deforms often result from an incorrect Push direction.
Deform Region
|
|
|
|
|
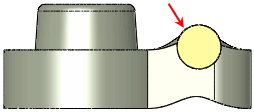
Select the tool body and the top faces of the target body for Additional faces to be deformed 
|
Surface push affects only the top faces. The bottom faces are unaffected.
|
The following example shows the results of using Bodies to be deformed  versus Additional faces to be deformed
.
versus Additional faces to be deformed
.
|
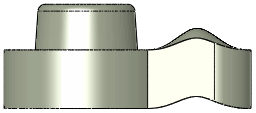
Tool Body and Bodies to be deformed (target body)
|

|
|
Surface push with Additional faces to be deformed (top face) selected
|
|
|
|
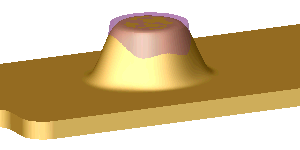
Surface push with the entire body selected for Bodies to be deformed and no faces selected for Additional faces to be deformed
|
-
Tool Body . Sets the tool body to use to deform the Bodies to be deformed (target bodies). Select a pre-defined tool body from the list: Ellipse, Ellipsoid, Polygon, Rectangle, Sphere. Set the tool body size using the callout in the graphics area. To use a tool body you have created, choose Select Body from the list, then select the tool body in the graphics area.
-
Deform deviation  . Specifies a fillet-like radius value for where the tool body intersects the target faces or bodies.
The following example shows how Deform deviation affects the surface push deform.
|

|
|
|
Deform deviation with a large value using the transparent cone as the
Tool Body
|
Deform deviation with a small value using the same transparent cone as the
Tool Body
|
Tool Body Position
These options allow you to reposition the tool body by entering exact numerical values. This method is more accurate than using the triad.
-
 ,
,  ,
,  Delta X, Y, Z. Moves the tool body along the X, Y, and Z axes.
-
 ,
,  ,
,  Rotation Angle
. Rotates the tool body about the X, Y, or Z axes and the origin of rotation.
Rotation Angle
. Rotates the tool body about the X, Y, or Z axes and the origin of rotation.
-
 ,
,  ,
,  Rotation Origin. Locates the center of rotation, represented by the triad in the graphics area.
Shape Options
-
Shape accuracy  . Controls the surface quality. The default quality can be inadequate in high curvature areas. When you increase the accuracy by moving the slider to the right, you can increase the success rate of the deform feature. Move the slider only as needed because increasing surface accuracy decreases performance.