Hide Table of Contents

Transparency During Component Editing

There are several options for displaying component transparency when you edit a component (part or subassembly) in the context of an assembly. These settings affect only the components that are not being edited.

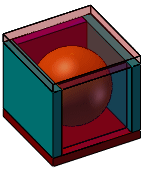
The illustrations below show the results of applying different settings during editing of the sphere in this assembly. The sphere is completely enclosed by blocks, some of which have transparency applied as a component property.

Setting Default Transparency for Component Editing

To set the default transparency to use during component editing:

  1. Click Options (Standard toolbar) or Tools > Options.
  2. Select Display/Selection.
  3. Under Assembly transparency for in-context edit, select one of the following:
    Option Description
    Opaque assembly Components not being edited are opaque.
    Maintain assembly transparency Components not being edited retain their individual transparency settings.
    Force assembly transparency Components not being edited use the transparency level you set here. Move the slider to the desired transparency level.
  4. Click OK

Changing Transparency for Components

To change the transparency of the components you are not editing:

  1. Select a component and click Edit Component (Assembly toolbar).

    The component you are editing turns opaque blue provided you have selected the system option Use specified colors when editing parts in assemblies. You must also turn off RealView. (See Colors When Editing a Component.) The appearance of the other components depends on the assembly transparency settings you choose.

  2. Click Assembly Transparency (Assembly toolbar) and select from the following:
    Option Description
    Opaque Components not being edited are opaque.
    Maintain transparency Components not being edited retain their individual transparency settings.
    Force transparency Components not being edited use the transparency level you set in System Options.

    Opaque Maintain Transparency Force Transparency
    Additionally, you can right-click any blank area and set Assembly Transparency on the shortcut menu to Opaque, Maintain Transparency, or Force Transparency.

  3. Edit the part as needed.
  4. Click Edit Component to return to editing the assembly, and to turn off transparency.


Provide feedback on this topic

SOLIDWORKS welcomes your feedback concerning the presentation, accuracy, and thoroughness of the documentation. Use the form below to send your comments and suggestions about this topic directly to our documentation team. The documentation team cannot answer technical support questions. Click here for information about technical support.

* Required

 
*Email:  
Subject:   Feedback on Help Topics
Page:   Transparency During Component Editing
*Comment:  
*   I acknowledge I have read and I hereby accept the privacy policy under which my Personal Data will be used by Dassault Systèmes

Print Topic

Select the scope of content to print:

x

We have detected you are using a browser version older than Internet Explorer 7. For optimized display, we suggest upgrading your browser to Internet Explorer 7 or newer.

 Never show this message again
x

Web Help Content Version: SOLIDWORKS 2015 SP05

To disable Web help from within SOLIDWORKS and use local help instead, click Help > Use SOLIDWORKS Web Help.

To report problems encountered with the Web help interface and search, contact your local support representative. To provide feedback on individual help topics, use the “Feedback on this topic” link on the individual topic page.