The Mounting Boss PropertyManager appears when you create a new mounting boss fastening feature.
To open this PropertyManager:
Click Mounting Boss  (Fastening Features toolbar) or .
Position
 |
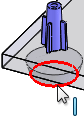
Select a face |
Defines a planar or non-planar face on which to place the mounting boss. Where you select the face, the software creates a point in a 3D sketch.
Edit the sketch and dimension the point to position the mounting boss.To place the mounting boss at an exact predefined location, before or after you create the boss, create a sketch with a point at the desired location, then select that point for Select a face . You cannot edit the point during feature creation.
|
| |
Select Direction (non-planar faces only) |
Sets a direction for the boss. If not specified, the boss is placed normal to the face at the selected point. Click Reverse Direction  if necessary. if necessary. |
 |
Select circular edge (optional) |
Defines a circular edge to position the center axis of the mounting boss. The projected center of the circular edge must intersect the face where the mounting boss is positioned.
Mounting boss position before selecting circular edge:

Position after selecting circular edge:
 |
Boss Type
Select Hardware Boss or Pin Boss.
A hardware boss can accept a screw.
| Hardware Boss |
Select Head  or Thread or Thread  |
| Pin Boss |
Select Pin  or Hole or Hole  |
To set options for the boss sub-type, see Hardware Boss Options or Pin Boss Options.
Fins
| |
Select a direction vector |
Defines a direction vector to position the first fin. Click Reverse Direction if necessary. No draft: 
Draft: 
|
 |
Enter the number of fins |
You can enter 0 if you do not want any fins.

|
| |
Equally spaced |
(Available for two fins only.) Creates a 180 degree angle between the two fins. This option is useful for corner bosses. Clear this option to select a direction vector that defines the second fin's orientation. Equally spaced selected: 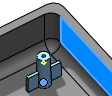
Equally spaced cleared: 
Select a face or edge to define the orientation of the second fin. See Varying a Fin's Direction.
|
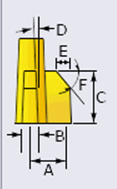 |
Set fin parameters |
Sets fin parameters. - A. Defines fin's length
- B. Defines fins' width
- C. Defines fins' height
- D. Defines draft angle of the fins
- E. Defines distance for fin chamfer from edge of fin
- F. Defines angle for fin chamfer
|
| |
|
Fin length is measured from the center of the boss:  Fin width sets the thickness at the base of the fin, before applying draft: 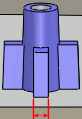
|