Main Area
The main area of the High Resolution workshop lets you store settings using profiles and manage high resolution.
ProfileProfiles store your settings for future use. For details, see
About Profiles for Workshop Settings. High resolution
| Command Name |
Description |
|---|
| Detail view |
(Available when
High resolution is selected.) Defines a portion of your scene to save as an image file or to capture as an Image 2D panel.
- Select
Detail view.
The
Image area crop box appears in the viewport.
-
Move
or resize the image area as needed.
-
To limit the image to specific actors,
select one or more actors.
When no actors are selected, the image will contain everything within the image area.
- To change the image resolution, specify
Pixels or
Dpi on the High Resolution tab.
-
Do one of the following:
-
To save the image area to a file, click
Save As
 . .
-
To create an Image 2D panel, click
Create
 .
.
Note:
You cannot control the zoom of the detail view. You can resize the panel after it is created, but scaling a raster image affects image quality. To create a detail view Image 2D panel with zoom, use
Digger. See Digger Commands
- To dismiss the image area, click
 (upper-right corner of the image area) or clear
Detail view. (upper-right corner of the image area) or clear
Detail view.
|
| Create |
(Available when
Detail view is selected.) Creates the detail view and adds it to the 3D scene as an Image 2D panel. |
| Update |
(Available when
Detail view is cleared and an Image 2D detail view is selected in the viewport.) Updates one or more detail views with changes in your 3D scene or different detail view options.
|
| Preview |
(Available when
Detail view is cleared and no Image 2D panel is selected.) Generates a JPEG preview image using your current workshop settings and displays it in your computer's JPEG-viewer application.
|
| Save As |
Saves the active viewport pane (or a portion of it when
Detail view is selected) as a raster image using the current workshop settings. In the Save As dialog box, choose from the following formats:
- Bitmap (.bmp)
- Jpeg (.jpg, .jpeg, .jpe)
- Tiff (.tif, .tiff)
-
Png (.png)
When generating BMP, TIFF, or PNG images with
Alpha channel selected, images are 32 bits (24-bit true color + 8-bit alpha). Otherwise, images are 24 bits (true color).
|
| High resolution |
Enables high resolution image generation. Set options from the
High Resolution Tab tab. When cleared, generates a standard image. Standard images use the viewport resolution, like a copy/paste of the image to the clipboard. |
| Anti-aliasing |
Enables anti-aliasing. Set options from the
Anti-Aliasing Tab. |
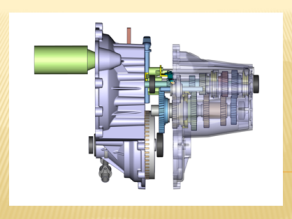
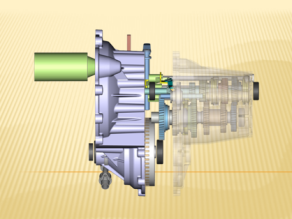
| Alpha channel |
Generates images with transparent backgrounds by including an alpha channel. Alpha channels simplify image compositing but increases file size. When selected, saved images are 32 bits (24-bit true color + 8-bit alpha). When cleared, images are 24 bits.
In this example, images are inserted into a PowerPoint slide:
|
|
| Alpha channel disabled
|
Alpha channel enabled
|
Notes:
- This option applies to PNG, TIFF, and BMP images. JPEG does not support alpha channels.
- When generating images with
Alpha channel and
Anti-aliasing selected but without
Hardware anti-aliasing, text 2D panels are not anti-aliased.
See High quality rendering / On demand.
|

High Resolution Tab
The High Resolution tab lets you set high-resolution image options such as size and quality.
Notes:
-
The
High resolution option must be enabled.
- Higher resolution images produce larger files.
| Command Name |
Description |
|---|
| Pixels |
Specifies width and height in pixels of the output image (or the detail-view image when
Detail view is selected).
To specify image size, specify values for two of the following:
Pixels,
Dpi, and
Size (mm). Composer computes the third set of values. Under
Auto, select the computed property. When
Use document's paper is selected,
Size (mm) is always
Auto and set to the paper size (or the detail-view size when
Detail view is selected). To maintain the document's paper-space ratio, which ensures proper scaling of your scene, you can specify only
Width or
Height (not both) depending on
Aspect ratio.
|
| Dpi |
Specifies width and height in dots per inch (dpi) of the output image (or the detail-view image when
Detail view is selected).
The dpi is the number of dots of ink on a printed page or pixels on a computer screen in a linear one-inch space. |
| Size (mm) |
(Available when
Use document's paper is cleared.) Specifies width and height in millimeters of the output image (or the detail-view image when
Detail view is selected). When
Use document's paper is selected,
Size (mm) is the paper-space size (or the image-area size when
Detail view is selected).
|
| Aspect ratio |
Specifies whether
Width or
Height is editable. The other value is calculated based on the paper-space height-to-width ratio (or the image-area height-to-width ratio when
Detail view is selected). |
| Use document's paper |
Defines
Size (mm) as the document paper-space size (or the image-area size when
Detail view is selected). To specify a different size while maintaining the paper-space aspect ratio, clear this option. |
| Remove ground |
Removes the ground (if displayed) from the output image. |
| White background |
Sets the background to white in the output image. |
JPEG settingsWhen generating JPEG images, you can control image quality and file size. Higher quality images produce larger files.
| Command Name |
Description |
|---|
| Quality |
Specifies the output image quality. Move the slider to select from low to high quality.
|
| Desired file size (KB) |
Specifies the desired image file size in kilobytes (KB). Composer adjusts the quality as needed. To see the actual file size, click
Compute. |
| Compute |
Calculates the output file size in KB.
|
Anti-Aliasing Tab
Anti-aliasing smooths rough edges (jaggies) to give the appearance of higher resolution by taking into account how much an ideal edge overlaps adjacent pixels.
| Command Name |
Description |
|---|
| Anti-Aliasing |
Specifies the anti-aliasing technique:
-
Jittering - The jittering method is higher quality but takes too long for real-time rendering. Use jittering for single image generation when high quality is required.
-
Multisample - Multisample anti-aliasing (MSAA) is a technique used in computer graphics to improve image quality.
|
| Number of passes |
(Available when
Jittering is selected.) Specifies the number of internal renderings made to create the effect. More passes take longer to perform but produce better results.
|
| Radius |
(Available when
Jittering is selected.) Specifies the portion of a scene that appears sharp. The image becomes blurred as you move away from the focal point. The higher the value, the larger the depth of field (less blur).
|
Multiple Tab
The Multiple tab lets you generate multiple high resolution raster images from your animation, views, or both.
Note:
The
High resolution option must be enabled.
| Command Name
|
Description
|
| Animation
|
Creates multiple images from an animation. Specify the image
frequency as one of the following:
- Frames between two images
- Images per second
Image files are named
<filename>_anim
<n><type>< ,
where:
-
<filename> is the file name you
specify in the
Save As dialog box (when you click
Save As).
-
<n> is the image index based on the
frequency and range you specify. For example, when you specify 30 images per
second starting at 5 seconds, the image indexes are 150, 151, and so on.
-
<type> is the format extension, as
determined by
Save as type in the
Save As dialog box.
|
| Range
|
(Available when
Animation is selected.) Specifies the
animation segment to capture:
-
All - The entire animation
-
Selection - The selected timeline segment

-
Seconds - The specified range in seconds
|
| Markers
|
Creates one image per marker in the timeline.
|
| Milestones
|
Creates one image per milestone in the timeline.
|
| Views
|
Creates images for all views (see
Views pane). To create images for the current view
only, clear this option.
|
| 360° Capture
|
Captures a defined number of images of the model
along a vertical axis performing a 360° clockwise rotation. The vertical axis
determines the orientation of the camera.
The vertical axis used in the one defined in the viewport
properties (see
Viewport Properties).
- If Z is defined as the vertical axis, then the rotation plane
will be XY.
- If Y is defined as the vertical axis, then the rotation plane
will be XZ.
- If X is defined as the vertical axis, then the rotation plane
will be YZ.
Enter the number of images you want to capture along the 360° path
in the
Number of Images box.
|
| File-name template
|
(Available when
Markers,
Milestones,
Views, or
360° Capture is selected.) Specifies the
naming convention for image files. You can specify valid file-name characters
and the following case-sensitive keywords:
| %filename%
|
The file name specified by
File name in the
Save As dialog box.
|
| %viewname%
|
The view name, as listed in the Views pane.
Note:
Not applicable to
360° Capture.
|
| %markername%
|
The marker name, as listed in the
timeline and in the Markers pane.
Note:
Not applicable to
360° Capture.
|
| %index%
|
A counter from 1 to the number of
views. Index values have the same number of characters (1-9, 01-99, 001-999)
for all files created.
|
Notes:
- The
Save As dialog box does not consider
File-name template when checking for
existing files. Use caution to avoid overwriting files unintentionally.
- Do not specify file-name extensions in
File-name template. Extensions are
determined by
Save as type in the
Save As dialog box.
- When
File-name template does not contain
%filename%,
File name in the
Save As dialog box is still required but
is not used in the file names.
- When
File-name template is blank:
- files generated from markers are named
%filename%_%markername%.
- files generated from milestones are named
%filename%_view.
- files generated from views are named
%filename%_%viewname%.
|
|