Decals
You can drag decals from the Task Pane onto a model and manipulate them
in the graphics area. Use the Decals PropertyManager
to specify properties, browse to images to use for decals, and save decals.
 You can view decals in SolidWorks,
eDrawings, and PhotoView 360 without activating PhotoWorks. To apply decals,
you must first activate PhotoWorks.
Decals cannot be added or edited in precise Hidden
Lines Removed, Hidden
Lines Visible, or Wireframe
display modes.
Mapping
can be Label (UV), Projection, Spherical,
or Cylindrical.
Illumination can be the same
as for the underlying material illumination or you can specify different
illumination. You can also set the decal to a constant illumination that
is not
affected by the scene lighting.
To add a decal from the Task Pane:
In the Task Pane, select the Appearances\PhotoWorks
 tab.
tab.
Expand Decals
 and select the decals
 folder or a folder containing custom decals.
Drag a decal from the lower pane into the graphics
area.
You can drag a decal to an entity such as
a face or a surface. If you drag the decal into an empty region of the
graphics area, it is applied to the whole part. Manipulators appear with
the decal, and the Decals
PropertyManager opens.
To add a decal from PhotoWorks:
With PhotoWorks activated, click New
Decal  (PhotoWorks toolbar) or PhotoWorks,
Decal.
In the Decals
PropertyManager, under Image file
path, browse to an image of type .bmp,
.gif, .jpg,
.png, .rgb,
.tga, .tif,
.wmf, or .p2d,
then click Open.
 You can also select a decal
from the list in the Appearance pane.
|
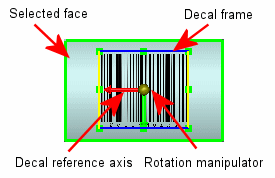
You can manipulate a decal in the graphics area:
Move
it by dragging the pointer anywhere inside the frame (except on the rotation
manipulator). Size
it by dragging the handles at the corners and sides of the frame. Rotate
it by dragging the rotation manipulator  at the center
of the decal. at the center
of the decal.
The decal reference axis remains at the original decal origin, even
when the decal is moved. The rotation manipulator moves with the center
of the decal. |

|
To save a decal to the Task Pane:
While the decal is displayed and the Decals
PropertyManager is open, under Decal
Preview, click Save Decal.
In the Save As
dialog box, browse to a folder, type a filename, then click Save.
If the folder does not already appear in
the Task Pane, a new folder is created under Decals
 on the Appearances\PhotoWorks
 tab and the new decal appears in the lower pane for
the specified folder.
Files in .p2d
format contain illumination settings and paths to the decal image and
any mask image. An associated .bmp
file provides a thumbnail image in the Task Pane.
To display or hide decals:
Click one: