DraftXpert
The DraftXpert manages the creation and modification of neutral plane
drafts. The DraftXpert takes trial and error out of the draft process.
You select the draft angle and references to draft, and the DraftXpert
manages the rest, which can include automatically reordering draft features
before adjacent fillets. See also Xperts
Overview.
The DratfXpert can:
Use the Add
tab to create new draft features or the Change tab to modify draft
features.
 Use the DraftXpert when you want the SolidWorks
software to manage the structure of the underlying features. Use the manual
Draft PropertyManager when you
want to maintain control at the feature level.
The following procedures demonstrate various uses of the DraftXpert
using this sample model.
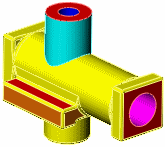
To access the DraftXpert:
Click Draft  (Features toolbar)
or Insert, Features,
Draft.
In the
PropertyManager, click DraftXpert.
To create multiple drafts and do
draft analysis using the DraftXpert Add tab:
In the
DraftXpert PropertyManager, click
the Add tab.
Under Items to Draft:
Set
the Draft Angle  . In this example, set it to 3.00deg.
Select
a Neutral Plane in the graphics
area. In this example, select the red-colored planar face on top
of the cylinder. The Direction of Pull
arrow points upward.

Select
the Faces to Draft  . In this example, select the cyan-colored cylindrical face.
Click Apply
to create the draft.

Under Draft Analysis,
select Auto paint to enable Draft Analysis.
The face you just drafted displays the Draft Analysis color for 3 degrees of
draft, while the inside of the cylinder is yellow, indicating no draft.
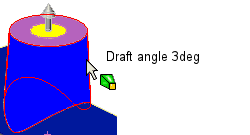
 Pointer feedback reports
the draft angle when you move the pointer over the drafted face.
Clear Auto paint.
Under Faces
to Draft, select another face for Neutral
Plane. In this example, select the red-colored face on the square
front of the model.

Select Auto paint.
The circular inside of the horizontal cylinder
is yellow, indicating no draft.
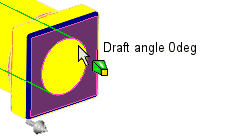
Select the circular inside for Faces
to Draft  , then click Apply
to create the draft.
The color of the circular inside updates
to indicate 3deg of draft. Pointer feedback verifies the draft angle.
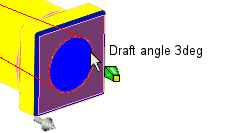
To change draft using the DraftXpert
Change tab:
In this example, you have already applied 3deg draft to the four orange-colored
faces (two faces on each side of the horizontal cylinder).
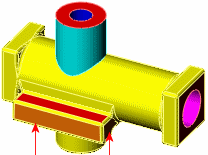
In the DraftXpert PropertyManager, select the
Change tab.
Under Drafts
to Change, select the draft items to modify for Faces
to Draft  . In this example, you select the two
orange-colored outer faces (one each on opposite sides of the horizontal
cylinder).

Set a value for Draft
Angle  and click Change
to modify the draft for the selected faces. In this example, change the
draft to 10deg.
Under Draft Analysis,
select Auto paint to see what
other faces need draft.
 To remove draft from faces,
you would click Remove.
Click  .
.
Related Topics
Draft Overview
Neutral Plane
Draft
DraftXpert
PropertyManager - Add
DraftXpert
PropertyManager - Change
Draft
Analysis Overview