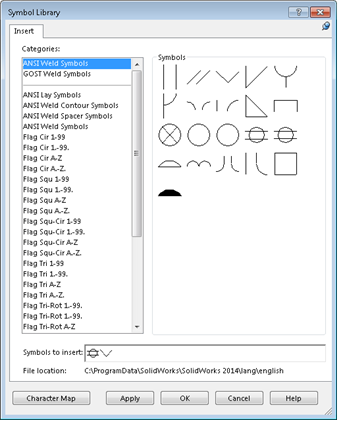
The Symbol Library dialog box has been overhauled for ease of use. Symbols in the dialog box are categorized by type. You can multiselect symbols and, using the Windows Character Map, you can select additional symbols to insert.
The Symbol Library is available to add symbols to:
- Dimension text
- Weld symbols
- Geometric tolerances
- Datum Features
- Annotation notes

To use the Symbol Library to insert symbols into dimension text:
- Click in a drawing dimension to open the Dimension PropertyManager.
- On the Value tab, at the bottom of the Dimension Text section, click More.
The Symbols Library dialog box opens. The top section of the Categories list on the left identifies the categories that contain the symbols that are displayed on the right.
- Click
 at the top of the dialog box to pin it open.
You cannot pin the Symbol Library dialog box when you launch it with an annotation note preview active or from the Weld Symbol dialog box.
- To add additional symbols to the Symbols display, click another category in the list.
Tooltips provide the symbols' names and tags.
- Click a symbol to add to the drawing dimension.
It appears in the Symbols to insert field.
You can also add a symbol directly to the drawing dimension by double-clicking it in the Symbols display.
- Do one of the following:
- To add the symbol to the dimension immediately, click Apply.
The dialog box remains open so you can select additional symbols.
Apply is only available when the Symbols Library dialog box is pinned.
- Click additional symbols to add them to the Symbols to insert field.
- To add symbols from the Microsoft Character Map:
- Click Character Map.
- In the Character Map, click a symbol and click Select to add it to the Characters to copy field.
- When you have added the characters you want, click Copy.
- Close the Character Map.
- Paste the characters into the Symbols to insert field.
- Click OK.