Camera PropertyManager

The Camera PropertyManager controls the properties of the selected camera.

You can also drag the camera, target, and field of view in the graphics area when the PropertyManager is open.

To display this PropertyManager:

  1. Open the DisplayManager and click View Scene, Lights, and Cameras Lights_Scenes_button.gif.
  2. Right-click Camera FM_Camera.gif and click Add Camera.

Camera Type

Aimed at target When you drag the camera or set other properties, the camera maintains the line of sight to the target point. Choose this option or Floating.
Floating The camera is not locked onto the target point and can move anywhere.
Show numeric controls Show numeric fields for camera and target position. When cleared, select the positions by clicking in the graphics area.
Align triad with camera (available when Floating is selected). Aligns the triad with the camera orientation. When cleared, the triad is aligned with the global coordinate system.
Lock camera position except when editing Disables the View commands (Rotate, Pan, etc.) in camera views except while editing camera views.

Target Point

Available when Aimed at target is selected.

  Target by selection Click on a point, edge, or face on the model in the graphics area to specify the target point.
To drag the target point when you have chosen a target point by selection, press Ctrl and drag. Target by selection is cleared and the selection is disabled, but the reference is maintained. If you again select Target by selection, the target point returns to the selection.

PM_Camera_Target_Percent_Distance_Curve.gif Percent distance along edge/line/curve

If you select an edge, line, or curve for the target point, enter a value, move the slider, or drag the target point in the graphics area to specify the target point distance along the entity.

To specify the target point numerically, under Camera Type, select Show numeric controls. Clear Target by Selection, then set values relative to the model origin for:
PM_Camera_Target_X.gif Target X  
Target Y  
PM_Camera_Target_Z.gif Target Z  

Camera Position

Position by selection The camera can be anywhere in space, or you can attach it to an entity on a component or in a sketch, including in an internal space in a model.
To drag the camera point when you have chosen the position by selection, press Ctrl and drag. Position by selection is cleared and the selection is disabled, but the reference is maintained. If you again select Position by selection, the camera position returns to the selection.

PM_Camera_Target_Percent_Distance_Curve.gif Percent distance along edge/line/curve

If you select an edge, line, or curve for the target point, enter a value, move the slider, or drag the target point in the graphics area to specify the target point distance along the entity.

Spherical If Position by selection is cleared and Spherical is selected, specify the camera position numerically by setting values relative to the target, based on a sphere around the Z axis with the zero point at the target:

PM_Camera_Camera_Spherical_Distance.gif Distance from target

PM_Camera_Camera_Spherical_Longitude.gif Longitude about target

PM_Camera_Camera_Spherical_Latitude.gif Latitude about target

Cartesian If Position by selection is cleared and Cartesian is selected, specify the camera position numerically by setting values relative to the model origin for:

PM_Camera_Camera_X.gif Camera X

PM_Camera_Camera_Y.gif Camera Y

PM_Camera_Camera_Z.gif Camera Z

Camera Rotation

Defines the camera orientation and direction.

If Floating is selected under Camera Type:
PM_Camera_Yaw.gif Yaw (side-to-side) Enter a value or move the slider to specify the camera angle side-to-side.
PM_Camera_Pitch.gif Pitch (up-down) Enter a value or move the slider to specify the camera angle up or down.
PM_Camera_Roll.gif Roll (twist) Available if Set roll by selection is cleared. Enter a value or move the slider to specify the camera roll angle.
  Lock camera position except when editing Select one of the following:

If Aimed at target is selected under Camera Type:
  Set roll by selection Select a line, edge, face, or plane to define the camera up direction. If a line or edge is selected, it defines the up direction. If a face or plane is selected, a line normal to the plane defines the up direction.
  Flip direction Available if Set roll by selection is selected and the up direction is specified. Flip the camera 180°.

Field of View

Field of view specifies the size of the lens.

PM_Camera_Field_of_View.gif Perspective Add perspective (the view that the eye normally sees) to the camera view.
  Standard lens presents Select from a list of lenses (35 mm Wide Angle, 50 mm Standard, 135 mm Telephoto, etc.). If you select Custom, specify the angle in View Angle.
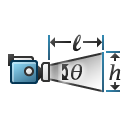
PM_Camera_Field_of_View_View_Angle.gif View angle Type an angle or move the slider. The height of the rectangle adjusts with changes in the view angle.
PM_Camera_Field_of_View_Height_Rectangle.gif Height of view rectangle Set the height of the view rectangle. The view angle adjusts with changes in the height.
PM_Camera_Field_of_View_Distance_to_Rectangle.gif Distance to view rectangle Set the distance to the view rectangle. The view angle adjusts with changes in the distance.
  Aspect ratio (width : height) Set a ratio by typing or selecting from the list. These formats are equivalent: 1.33, 4 : 3, 4 / 3, 4 x 3. The camera view (right viewport) shows the shape and area of the model that is visible to the camera.
  Drag Aspect Ratio When enabled, you can change the aspect ratio by dragging the Field of View rectangle in the graphics area. When disabled, dragging changes the scale only.

Depth of Field

Only available with PhotoView 360 enabled. PhotoView is available with SOLIDWORKS Professional and SOLIDWORKS Premium. To enable PhotoView, click the Premium tab in the CommandManager and click PhotoView 360.

PM_Camera_Depth_of_Field.gif
  Depth of Field Depth of field specifies the region in which the objects are in focus. Planes appear in the graphics area to indicate the focus plane and planes on each side of the focus plane for approximate loss of focus. The parts of the model intersecting the focus plane are in focus.
  Focus by selection Click in the graphics area to select the distance to the focus plane. You can then adjust the distance from the focus plane to the plane of loss of focus.
PM_Camera_Depth_of_Field_Distance.gif Distance to plane of exact focus If Focus by selection is cleared, set the distance to the plane of focus.
PM_Camera_Depth_of_Field_Focus_to_Non.gif Approximate distance from focus plane to loss of focus Set the distance from the focus plane to the planes (one on each side of the focus plane) indicating approximate loss of focus. The loss of focus planes are not equidistant from the focus plane because fewer pixels display an object at a greater distance than when the object is closer to the camera. Setting the loss of focus distance is not precise, but specifying a distance allows repeating results.

Camera_DOF_Focus_Planes.gif