| When you are not using models built with SOLIDWORKS, import parts into SOLIDWORKS. |
Use the Import/Export tools to import models into SOLIDWORKS from another application. The model geometry in imported parts can include imperfections such as gaps between surfaces. The SOLIDWORKS application includes an import diagnostic tool to address these issues.
|
| Determine if a model (imported or built in SOLIDWORKS) includes faces without draft. |
Use the Draft Analysis  tool to examine the faces to ensure sufficient draft. Additional functionality includes: tool to examine the faces to ensure sufficient draft. Additional functionality includes:
|
Face classification
|
Display color-coded count of faces with positive draft, faces with negative draft, faces with insufficient draft, and straddle faces.
|
|
Gradual transition
|
Display the draft angle as it changes within each face.
|
|
| Check for undercut areas. |
Use the Undercut Analysis  tool to locate trapped areas in a model that prevent ejection from the mold. tool to locate trapped areas in a model that prevent ejection from the mold. These areas require a mechanism called a “side core” to produce the undercut relief. Side cores eject from the mold as it is opened.
|
| Scale the model. |
Resize the model's geometry with the Scale  tool to account for the shrink factor when plastic cools. For odd shaped parts and glass filled plastics, you can specify nonlinear values. tool to account for the shrink factor when plastic cools. For odd shaped parts and glass filled plastics, you can specify nonlinear values. |
| Select the parting lines from which you create the parting surface. |
Generate parting lines with the Parting Lines  tool that selects a preferred parting line around the model. tool that selects a preferred parting line around the model. |
| Create shut-off surfaces to prevent leakage between core and cavity. |
Detect possible sets of holes and automatically shut them off with the Shut-off Surfaces  tool. The tool creates surfaces to fill the open holes using no fill, tangent fill, contact fill, or a combination of the three. The no fill option is used to exclude one or more through holes so you can manually create their shut-off surfaces. You can then create the core and cavity. tool. The tool creates surfaces to fill the open holes using no fill, tangent fill, contact fill, or a combination of the three. The no fill option is used to exclude one or more through holes so you can manually create their shut-off surfaces. You can then create the core and cavity. |
| Create the parting surface, from which you can create the tooling split. With certain models, use the ruled surface tool to create interlock surfaces along the edges of the parting surface.
|
Use the Parting Surface  tool to extrude surfaces from the parting lines generated earlier. These surfaces are used to separate the mold cavity geometry from the mold core geometry. tool to extrude surfaces from the parting lines generated earlier. These surfaces are used to separate the mold cavity geometry from the mold core geometry. |
| Add interlock surfaces to the model. |
Apply these solutions for interlock surfaces:- Simpler models. Use the automated option that is part of the Tooling Split
 tool. tool.
- More complex models. Use the Ruled Surface
 tool to create the interlock surfaces. tool to create the interlock surfaces.
|
| Perform tooling split to separate core and cavity. |
Create the core and cavity automatically with the Tooling Split tool. The Tooling Split tool uses the parting line, shut off surfaces, and parting surfaces information to create the core and cavity, and allows you to specify the block sizes. |
| Create side cores, lifters, and trimmed ejector pins. |
Use Core  to extract geometry from the tooling solid to create a core feature. You can also create lifters and trimmed ejector pins. to extract geometry from the tooling solid to create a core feature. You can also create lifters and trimmed ejector pins. |
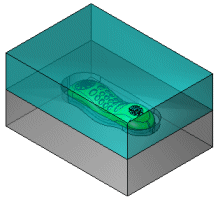
Display the core and cavity transparently, enabling you to view the model inside.
|
Assign different colors to each entity with the Edit Appearance  tool. The Edit Appearance tool also manipulates optical properties such as transparency. tool. The Edit Appearance tool also manipulates optical properties such as transparency. |
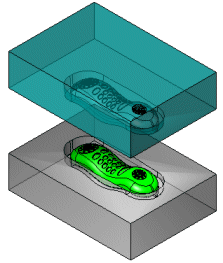
Display the core and cavity separated.
|
Separate the core and cavity at a specified distance with the Move/Copy Bodies  tool. tool. |