Positioning Parts with the Triad

You can use the triad to position parts in a route with greater precision for piping, flexible tubing, and electrical.

To display the triad every time you place a part, click Tools > Options > Routing and select the option Use triad to position and orient components on drop.

You can also right-click a part and select Move fitting with triad.
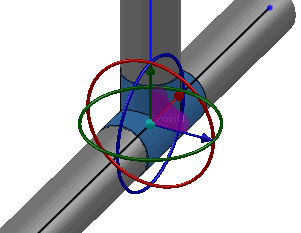


Any subsequent action, such as clicking in the graphics area, closes the triad.

Rotating a Part with the Triad

You can rotate a part after placing it in a route.

  1. Place the triad, as explained in Positioning Parts with the Triad.
  2. Click and rotate the appropriate circle in the triad to orient the part. Each circle in the triad rotates the part in a different direction.
    The degrees of rotation appear and the part rotates.

  3. Release the mouse button when you reach the desired position.

Moving a Part with the Triad

You can move a part after placing it in a route.

  1. Place the triad, as explained in Positioning Parts with the Triad.
  2. Click and drag a handle to move the part.
    The part moves, with the distance displayed, and the pipes appear disconnected.

  3. Release the mouse button when you reach the desired position.
    The pipes reconnect, except when you move the part out of alignment, in which case guidelines appear, as shown.

  4. Convert the guidelines to a route using Auto Route . You can also right-click a guideline and select Convert Guidelines.
    The guidelines are converted to a route.

    Guidelines only appear in the edit session in which fittings are moved using the triad.