You create exploded views by selecting and dragging parts in the
graphics area, creating one or more explode steps.
To create an exploded view:
-
Do one of the following options:
- Click Exploded
View
 .
.
- Click .
- In the ConfigurationManager
 , right-click a
configuration name and click New Exploded
View.
, right-click a
configuration name and click New Exploded
View.
-
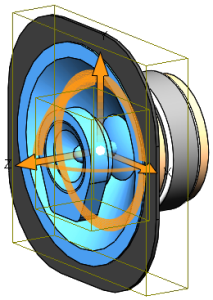
Select one or more components to include in the first explode
step.
In the PropertyManager, the components appear in
Explode Step Components 
. Rotation and translation
handles appear in the graphics area.
To move or align the handles:
- Drag the center ball.
- Press
Alt + drag the center ball or an arm, and drop it on
an edge or face to align a translation handle with the edge or
face.
- Press
Alt + drag the center ball or a circle, and drop it
on a curved edge or surface to align a rotation handle with the
curved edge or surface.
- Right-click the center ball and select Align to, Align with Component Origin, or Align with Assembly Origin.
- In the PropertyManager, select Rotate about each component
origin.
-
Drag a translation or rotation handle to move selected
components.
-
Modify explode options:
| Option |
Description |
|---|
Reverse Direction  |
Reverses the translation direction. |
Explode Distance  |
Specifies the translation distance. |
Reverse Direction  |
Reverses the rotation direction. |
Rotation Angle  |
Specifies the rotation angle. |
-
Click Done.
The explode step appears under Explode Steps.
-
Create more explode steps as required, and click
 .
.
The exploded view feature,
Exploded
View
, appears in the
ConfigurationManager under the configuration in which the exploded view
was created.
The exploded steps  appear
under the exploded view. Each configuration can have multiple exploded
views.
appear
under the exploded view. Each configuration can have multiple exploded
views.