In an assembly, you can join two or more parts to create a new part. The join operation removes surfaces that intrude into each other's space, and merges the part bodies into a single solid volume.
-
Create the parts that you want to join, then create an assembly
containing the parts.
-
Position the parts
in
the assembly. The parts may either touch each other or intrude into one another.

-
Save the assembly but do
not close the window.
-
Insert a new part into the assembly:
-
Click New Part
 on the Assembly
toolbar, or click .
on the Assembly
toolbar, or click .
-
Click a plane or planar face on a component.
In the new part, a sketch opens on the selected plane.
-
Close the sketch. Because you are creating a joined part, you
do not need the sketch.
-
In the FeatureManager design tree, right-click the new part
name, select Rename Part, and rename the
new part.
-
Click .
-
Make selections and set options in the Join PropertyManager.
-
Click
 to
create the joined part.
to
create the joined part.
 |
 |
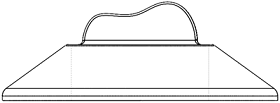
| Before join - coincident
faces |
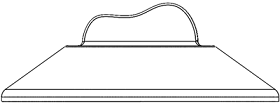
After Join - faces are
removed |
-
To return to editing the assembly, right-click the assembly
name in the FeatureManager design tree, or right-click anywhere in the graphics
area, and select Edit Assembly:<assembly_name>.
The new component,
Part1, appears in the FeatureManager Design Tree. The part contains the Join feature,
Join1.
The joined part is fully associative to the original parts and to the assembly. Any changes made to the original parts are reflected in the joined part. If the parts move relative to each other in the assembly, the joined part changes also.