Use the Customize Hardware page to
select standards, categories, types, and components. At the component level you can select
component sizes, type property values, and type part numbers.
To simplify configuration, select only the hardware that you use.
Navigate through standards using the left pane or by clicking folders
in the right pane.
To access the Customize
Hardware page:
- From Windows, click
.
- Click 2 -
Customize Your Hardware.
To configure a particular type or component:
Right-click the folder or component in the SOLIDWORKS Design Library task pane and select Configure.
You customize hardware by selecting individual components and
setting their property values.
To display a component:
Click a standard in the left pane and expand its categories and
types, or click the folder icons in the right pane. Under a type, select a
component. The page shows the component icon, name, and the number of possible
configurations.
Reduce the number of configurations for a component by
clearing sizes and configuration values you do not use. As a result, you have fewer
part numbers to enter and a smaller Toolbox that is easier to use.
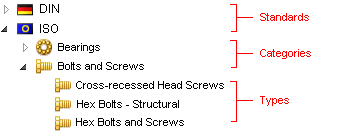
Left Pane
The Toolbox Standards tree in
the left pane lists standards, categories, and types, in addition to the custom
folders and components you define.
You can right-click items in the left pane and perform the following
on files in standards folders, categories of standard folders, folders of types of
components within a category, or individual component files:
- Cut and paste files, retaining file names
- Copy and paste files
- Delete files
- Insert new subfolders
- Add new files
You can double-click file or folder names to rename them.
Right Pane
Only items that are selected in the right pane are included in your
Toolbox. You can select or clear items in the right pane.
To remove an item, clear the check box. Once you clear an item, it
is disabled in the left and right panes until you select it again.
If you delete an item or standard from the left pane it remains
unavailable.
To open a standard, category, or type, click a folder in the right
pane. Click Back Up
 to navigate up one level.
Click Purge Inactive Data tool to inactive
configuration data from Toolbox part files.
To select or clear component sizes and edit component properties,
select the individual component.
Standard Properties
Click a standard property name and select or clear values in the list
on the right.
| |
General |
Description. Names the component in the Toolbox Standards tree. To rename a standard, modify the
description.
Filename. Specifies the
relative path to the master part for the selected component.
Use single Part
Number per size, regardless of length is
available for components with editable length properties, such
as structural steel. Select this option to assign one part
number for all lengths of a given size. Clear this option to
assign a part number to each length. When selected, the
Length and
Configuration Name
columns are removed and the table lists only configurations with
unique sizes.
|
| |
Component properties |
The list of properties varies by
component. Common properties include dimensions (such as Size) and Thread Display. The property values you select determine the total number of
component configurations. Clear size and other property values
to reduce the number of configurations.
|
 |
Global Property |
Indicates the property is shared
with other components in the standard. |
 |
Add
New Size |
Opens the Add New Size dialog box, where you
can add a custom size to the hardware size or length configuration
property list. |
| |
Color |
Specifies the display color for
the component. Click a color, or click Default Color to restore the default. |
Custom Properties
Custom properties are user-defined component properties. You can
create custom text properties and lists.
Once you create a custom property, it appears in the Custom Properties list. You select it to apply it
to a component:

You can then set property default values in the list on the right.
The property has read-only values until you select it.
 |
Add
New Custom Property |
Creates a new custom property.
See Custom Property
Definition. |
 |
Modify
Custom Property |
Edits an existing custom
property. See Custom Property
Definition. |
 |
Delete
Custom Property |
Deletes the property from
Toolbox. |
 |
Material Custom Property |
Indicates a custom property that
lists materials from the SOLIDWORKS Materials library. You can
create only one property linked to the SOLIDWORKS Materials
library. |
Property Value List
When you click a standard or custom property, the data pane displays
a list of values for the property. You use the value list to select or clear sizes
of standard properties.
For custom text properties, you can set default values for the
selected component.
For custom list properties:
- To disable list items for the selected component, clear
Enabled.
- To designate the default value, click Default.
Configuration List
The configuration list contains all possible combinations of the
standard and custom properties values for a selected component.
If you clear a property value, the list is updated and the
configuration count is reduced.
The list columns are the component properties. All of the columns
except Part Number, Description, and Comment are view-only. The values for Part Number, Description,
and Comment appear in the configuration
properties in SOLIDWORKS.
| |
Configuration Name |
Contains property values for each configuration
in abbreviated form.
|
| |
Part
Number |
Specifies the configuration part number. In Toolbox, Part Number is the
SOLIDWORKS bill of materials (BOM) part number. If you use a
different configuration-specific custom property in SOLIDWORKS PDM for part
numbers, use that custom property for your Toolbox parts as
well. For example, the standard SOLIDWORKS PDM part data
card maps to the SOLIDWORKS Number custom property. To use the
standard part data card with Toolbox parts, create and
populate a Number custom property in Toolbox
instead of using Part
Number.
|
| |
Description |
Specifies a configuration description.
|
| |
Comment |
Specifies a comment for the configuration.
|
 |
Import/Export |
Import/Export is located above the
configuration list scroll bar.
Click Import/Export
and do any of
the following:
- To import customized parts from an Excel
spreadsheet, click Import
Data.
- To export the configuration table to an
Excel spreadsheet so that you can enter configuration
part numbers and other values, click Export Data. See Customizing Parts with Part
Numbers.
- To create a new SOLIDWORKS part for each
listed configuration in the parts folder specified on
the User Settings
page, click Create
parts. SOLIDWORKS must be running to
create parts. This option is available if Create parts is
selected (see Toolbox - User
Settings).
Create Parts can
create thousands of part files for a single
component. Do not select it unless you are a Toolbox
administrator and know that part files are needed.
- To add all
listed configurations to the master part file, click
Create
Configurations. This is available if you
clear Create
parts (see Toolbox - User Settings).
|
You can rearrange columns by dragging column
headers.