This topic shows how to create
a C++ add-in using Microsoft Visual Studio
2022. The add-in
adds a menu item to the context-sensitive and Tools menus of vaults in File Explorer.
-
Create the C++ project.
-
Start Microsoft Visual
Studio as Administrator.
- Select File >
New > Project.
- From the dropdowns, select
C++, All platforms, All project
types.
- Select ATL Project.
- Click Next.
- Enter Project name,
Solution (Create new solution or Add to solution), Solution
name (if Create new solution).
- For Location, click
... and navigate to the folder where to create your project.
- Click
Create.
-
Select Support options > Support MFC in the ATL Project
dialog.
-
Click
OK to generate the
project. If the ATL Project is missing, the Visual Studio Installer will
suggest that you install any frameworks, SDKs, and
tools that you need. For example, you may need to install the
Desktop development with C++ workload. The workloads can be found
by clicking Tools > Get Tools and Features > Desktop & Mobile.
After installation, you may be asked to reboot to continue with updates to Visual
Studio.
-
You will see two projects in Solution Explorer,
project_name and project_namePS. The
project referenced in the following steps is project_name.
-
Modify the project's settings.
-
Right-click the project in Solution Explorer, and select
Add > New Item.
-
Select ATL.
-
Select ATL Simple
Object.
-
Click Add.
-
Type MyAddIn in Short name.
-
Click Next and Next.
-
Select
Custom in the Interface and Both in the Threading
Model.
-
Click Finish.
-
Select View > Class View and expand your project in the Class View window.
-
Right-click CMyAddIn and select Add >
Implement Interface.
-
Select Project and select the most recent SOLIDWORKS PDM Professional type library,
Edm.tlb, from
the Available type libraries list.
NOTE: If the type library is not in the list, you must
copy Edm.tlb from the installation API folder to project_path\project_name\project_name.
Then select File, browse to project_path\project_name\project_name,
and select Edm.tlb.
-
Select
IEdmAddIn5
in Interfaces .
-
Click the single right-arrow button to move IEdmAddIn5 to
Implement Interfaces, and click Finish.
Two
new methods,
IEdmAddIn5::GetAddInInfo and
IEdmAddIn5::OnCmd,
are added to your class.
-
Select File > Save All.
-
Implement
IEdmAddIn5::GetAddInInfo by replacing
STDMETHOD(GetAddInInfo)in MyAddin.h with the following code.
STDMETHOD(GetAddInInfo)(EdmAddInInfo
* poInfo, IEdmVault5 * poVault, IEdmCmdMgr5 * poCmdMgr)
{
AFX_MANAGE_STATE(AfxGetStaticModuleState());
if (poInfo == NULL || poCmdMgr == NULL )
return E_POINTER;
//Return some information
to the Properties dialog box
poInfo->mbsAddInName= SysAllocString( L"My first
add-in" );
poInfo->mbsCompany = SysAllocString( L"The name of my
company" );
poInfo->mbsDescription= SysAllocString( L"This is a very
nice add-in." );
poInfo->mlAddInVersion = 1;
//SOLIDWORKS PDM Professional 5.2
(or later) is
required by this add-in
poInfo->mlRequiredVersionMajor = 5;
poInfo->mlRequiredVersionMinor= 2;
//Add hooks and menu commands to
SOLIDWORKS PDM Professional
//Below is a menu command that
appears in the Tools
//and context-sensitive menus of a
vault in File Explorer
poCmdMgr->AddCmd( 1, bstr_t("My first menu
command"), EdmMenu_Nothing, bstr_t(""), bstr_t(""),
0, 0 );
return S_OK;
}
-
Implement IEdmAddIn5::OnCmd by replacing
STDMETHOD(OnCmd)in MyAddin.h
with the following code.
STDMETHOD(OnCmd)(EdmCmd *
poCmd, SAFEARRAY * * ppoData)
{
AFX_MANAGE_STATE(AfxGetStaticModuleState());
if (poCmd == NULL ||ppoData == NULL)
return E_POINTER;
MessageBox((HWND)poCmd->mlParentWnd,
bstr_t("Hello
World!"),
bstr_t("SOLIDWORKS PDM Professional"), MB_OK );
return S_OK;
}
NOTE:
If you copy the code from this topic and paste it into the IDE, delete any characters or spaces that offend the
compiler. On a 64-bit computer, you must replace L
with bstr_t() for the strings in the MessageBox.
-
Specify the project configuration properties:
-
Right-click the project name in Solution Explorer and
select Properties.
-
Select Configuration Properties > General and
Advanced.
Ensure that the properties on those two tabs are configured as:
-
Output Directory:
$(SolutionDir)$(Platform)\$(Configuration)\
-
Configuration Type: Dynamic Library (.dll)
-
Use of MFC: Use MFC in a Shared DLL
-
Character Set: Use Unicode Character Set
-
Select Linker > General.
Ensure Output File is:
-
Select Linker > Input.
Ensure that Module Definition File is
.\project_name.def.
-
Select Linker > Embedded IDL.
Ensure the properties are configured as follows:
-
Select MIDL > General.
Select the environment in the Target Environment
dropdown that
most closely matches your environment.
-
Select MIDL > Output.
Ensure the properties are configured as follows:
-
Click OK.
-
To change the project's type of configuration to
Release:
-
In the Solution Explorer, right-click Solution 'project_name'
and select Configuration Manager.
-
Click the down-arrow key in the project's Configuration
column and select Release.
-
Click Close.
-
Save the project. Compile
the project for x64 to create and register an add-in DLL that is compatible
with your system.
NOTE: See Using .NET Framework in Add-in Applications
if a problem occurs at runtime.
-
Add the new add-in, project_name.dll, to
the file vault:
- Start up the SOLIDWORKS
PDM Professional Administration tool
as Administrator.
- Expand the vault where
you want to install this add-in. Log in, if prompted.
- Right-click Add-ins and select New
Add-in.
- Select:
- If x32:
project_path\project_name\Release\project_name.dll, and click
Open.
- If x64:
project_path\project_name\x64\Release\project_name.dll, and click
Open.
The add-in Properties dialog displays the add-in's name,
company, add-in version, required version of SOLIDWORKS PDM Professional,
package, and description.
- Click OK.
-
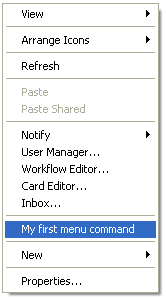
Right-click the vault directory in File Explorer to
show the context menu:

The new menu item,
"My first menu command", appears in the context menu.
-
Select My first menu command on the context-sensitive
menu.
-
A message box is displayed.
Use
your new add-in to
create more advanced menu commands or
add-in hooks that allow you to check files in and out of the vault.
If you experience difficulties compiling the C++ add-in after following
all the steps outlined above, you should submit a service request using the
API Support App. An API Support Engineer can provide you with assistance.