You now mesh the
assembly and observe the mixed mesh. Then you run the Partial study.
-
In the Simulation study tree, right-click Mesh
 and select Create Mesh
 .
.
-
In the PropertyManager, click
 .
.
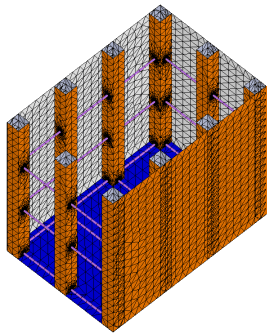
The mixed mesh shows shell elements (for roof, columns, and vertical
panels) and beam elements. In the graphics window, rotate the model to bring the roof to
the bottom as shown.
For more information about element types, see SOLIDWORKS Simulation Help: Element Types.
The top and bottom shell faces should be oriented consistently
across all model surfaces. The bottom face of the shell is highlighted in orange.
If you observe any inconsistencies, do the following:
- Create the mesh.
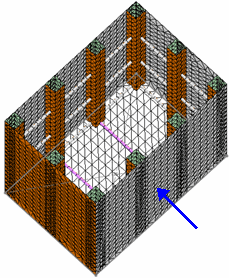
Notice the image displayed above. The
bottom face of the shells is shown in orange. For all other shell faces in the
assembly, the bottom face of the shell is exposed to the outside. However, for the
face shown by the blue arrow, the bottom face of the shell is located on the
inside.
- To reorient the shell surfaces across the assembly, select the face shown by the
blue arrow from the graphics window. Then, right-click Mesh
 in the Simulation study tree and
select Flip Shell Elements.
in the Simulation study tree and
select Flip Shell Elements.
All shell faces are oriented consistently across the model.
For more information about top and bottom faces of shells, see Meshing in SOLIDWORKS Simulation
Help: Modeling Shell Problems.
-
Click Run This Study
 (Simulation CommandManager).